
Friday, April 1, 2011

Wednesday, March 23, 2011
FLEXIBLE MOLD
FLEXIBLE MOLD COMPOUND
This is new mold material is much superior to ordinary gelatin (mold glue) and is very easily made. It does not shrink or dry out like ordinary casting gelatins. If made according to directions it will retain all its original qualities indefinitely, and can be remelted when necessary.
FORMULA:
Flake Gelatin . . . . . . . 4 1/2 pounds
Water . . . . . . . . . . . . 4 1/2 pints
Glycerin . . . . . .. . . . . 9 pounds
Glucose . . . . . . . . . . .1 pound
Denatured Alcohol . . 1 ounce
PROCESS: Place the gelatin in a large container and pour the water over same; then cover container with damp cloth to prevent evaporation. Mix up thoroughly with the hands every ten minutes to keep water evenly distributed, otherwise the bottom will absorb too much water and the top portion will dry out and harden. Replace cloth after each mixing. After gelatin is thoroughly softened, squeeze out all surplus water (if any), and place in double boiler and melt. A few minutes after it begins to melt start stirring and keep stirring until the gelatin is all melted and free from lumps. Then add the glycerin (which should have previously been heated) and stir until blended. Continue to stir until all ingredients are thoroughly incorporated and remove from fire. Now add the alcohol and stir until thoroughly blended with the rest of the mixture. The compound is now ready for use. Do not add water when remelting.
A double boiler can easily be made by using two metal buckets or pans, one larger than the other. Put a few stones in the bottom of the larger container and partly fill with water. Then put mold compound into smaller container and place it in large container. There should be enough water in large container to come up at least half way on outside of small container. The stones are to prevent the small container from touching the bottom and thereby burning the mixture. Leave unused material in container in which it was melted.
HOW TO GET THE ABOVE COMPOUND TO MAKE MOLDS: First select the article you desire to duplicate. Almost all articles can be duplicated, such as celluloid novelties, metal toys, dolls, etc. Articles cast in compositions, book-ends, emblems, etc.
If the article to be cast is very simple, with one entire side flat like a book-end, emblem, or plaque, it is only necessary to lay it on some flat, smooth surface, like glass or marble, face up. Place a frame of wood or metal bars around it, having oiled the object and other parts well; then pour the pliable mold composition over it. However, for more complicated things such as door stops and novelties in forms of dogs, cats, dolls, etc., you will have to make a mold in two pieces.
To make two piece molds, plaster should be used to reinforce the mold. To make good molds you must bear in mind that both this compound and rubber gives under the weight of the casting material. Therefore, some means must be used to hold molds made from these materials in shape. It must be made so that the mold can easily be removed from the reinforcing shell so that the mold may then be removed from the casting without damaging it.
After you have applied the molding composition or last coat of rubber and compound starts to set - spread about 1/2 inch thickness of plaster mortar over it with a trowel, let set and then remove it. For full body molds in two parts - make one half, let it stand until set, cut notches in the plaster shell around the edge that will be spliced to the other half and then apply rubber and plaster to the other half. To prevent the plaster sticking, coat the splice edge of the first half with two coats of ordinary rubber cement.
RUBBER MOLDS
GUTTA-PURSHA MOLDS:
Purchase a sheet of GUTTA-PERCHA, about one-fourth of an inch thick. Cut it about size desired. Soak it in NAPTHA (which causes it to swell), then soak it in hot water. This makes the sheet of Gutta-Percha soft and mushy in appearance, somewhat like a wet rag. Then in this condition, press it against your model, slowly but firmly.
When there are small cavities such as the mouth or eyes of a figure, be sure that you get the rubber all the way in . . . the better you press it, the sharper the mold will be.
Try it on a plaque first, for that can be made in one piece mold. When it is sufficiently pressed, have some plaster mixed and pour it over the mold. This will harden quickly and so hold your rubber mold (Gutta-Percha), in place until it gradually dries out. It will then retain its shape. This plaster shell should always be used to hold mold rigid while casts are being made.
To make a mold of a figure in the round (showing both sides) the mold must be made in two pieces, with shell of plaster to hold them in place, same a described previously.
Tuesday, March 22, 2011
Irish Crochet Rose and Shamrock Edging
Irish Crochet Rose and Shamrock Edging

Pattern Directions -
Abbreviations:
ch = chain
dc = double crochet
dtr = double treble
ea = each
sc = single crochet
sk = skip
sl st = slip stitch
sp = space
sps = spaces
st = stitch
sts = stitches
tr = treble
How To Slip Stitch (sl st) = Insert hook in stitch, wrap thread or yarn over hook, pull thread or yarn through the stitch and through the loop on the hook, at the same time. A slip stitch does not add any height and is used to join a chain or stitch to another place in the crochet piece.
For a double treble (dtr), the yarn or thread is wrapped around the hook 3 times before beginning the stitch. How To Do A Double Treble
In this pattern, (depending on your own crochet tension) each time that it calls for a double treble (dtr) in the second row edging directions, you may find that a triple treble will work better for you (if a double treble isn't going to comfortably reach to the stitch that it's supposed to, then you'll know that it will work better to substitute a triple treble for the double treble in that spot). How To Do A Triple Treble
Materials: Use thread size of your choice or yarn weight of your choice. Some of the most commonly used sizes are:
Size 10 cotton thread with a size 8 steel hook
Sport weight yarn with a size F hook
Worsted weight yarn with a size G hook
Rose Directions
Rose, Starting Chain: Chain 6. Join (with a slip stitch) to form a circle.
Rnd 1: ch 5 (counts as first dc and first ch-2), * Dc in circle, ch 2 **, repeat from * to ** 4 more times, join with sl st in the 3rd ch of the beginning ch-5 of round. (There should be 6 ch-2 spaces in this round.)
Rnd 2: ch 1, sc in same stitch as sl st just made at end of previous round, * 5 dc in next ch-2 sp, sc in next dc, **, repeat from * to ** around.
Rnd 3: ch 1, sl st in base in the back of the sc just made at end of previous row, * ch 5, sc in base at the back of next sc (between petals) **, repeat from * to ** around. (When finished, if the ch-5 loops are in front of the petals, pull on the chain-5 loops so that they are behind the petals, before working the next round.)
Rnd 4: ch 1, then work (sc, 7 dc, sc) all in first ch-5 sp * (sc, 7 dc, sc) all in next ch-5 sp **, repeat from * to ** around.
To finish rose: End off. Weave in ends.
For photos showing how to do parts of the rose pattern above, see this web page: http://web.archive.org/web/20070311190558/http://crochet.about.com/library/weekly/aa030803.htm
Edging Directions -
First, make the number of individual roses that will be needed for the length of the edging.
Edging is started with a shamrock: Chain 18, sl st in the 10th ch, to form a circle with part of the chain. (3 sc, 3 dc, 3 tr) in the ch-10 circle just made (this will cover half of the circle). Next, join to a rose by doing a sl st in the 4th dc (center) of any outside petal of a rose (be sure right side of rose is on the same side as right side of the started shamrock), then continue to crochet the rest of the shamrock circle, as follows: (3 tr, 3 dc, 3 sc) in remainder of the ch-10 circle (first shamrock leaf formed). Ch 10, sl st in the 10th ch of the beginning shamrock chain (this is the same spot as the base of first leaf made), for next leaf: work (3 sc, 3 dc, 6 tr, 3 dc, 3 sc) all in the ch-10 circle just made. When forming third leaf, join to next rose, as follows: Ch 10, sl st in the 10th ch of the beginning shamrock chain, (3 sc, 3 dc, 3 tr) in the ch-10 circle just made (this will cover half of the circle). Next, join to a rose by doing a sl st in the 4th dc (center) of any outside petal of a rose (be sure right side of rose is on the same side as right side of the started shamrock), then continue to crochet the rest of the shamrock circle, as follows: (3 tr, 3 dc, 3 sc) in remainder of the ch-10 circle. Sl st in base of leaf. To form shamrock stem: sc in ea of remaining 8 chains of the beginning ch-18. End off. Weave in end.
Begin another shamrock: Follow directions same as for first shamrock. The only difference is that, when you are ready to slip stitch the first shamrock leaf to a rose, instead of attaching to a new rose, you will be attaching (with a slip stitch) to the right-hand side of the last rose that you attached to the previous shamrock.
Continue for length needed: Continue making additional shamrocks and attaching roses until you have the length that you want for your edging.
Second Row: This row will be worked along the top of the joined roses and shamrocks (the top is the side with the shamrock stems.) Join thread to the center stitch of a petal of the first rose (this should be the petal which is two petals over to the right away from the petal that a shamrock leaf is attached to), ch 8, * dc in center stitch of next petal, ch 4, dtr in the sl stitch connection between the shamrock and the rose, ch 4, dc in center of side of leaf, sl st into end of stem, ch 3, skip 3 sts of stem, sl st in next st, ch 3, dc in center of side of next leaf, ch 4, dtr over connection, ch 4, dc in petal of next rose, ch 4; repeat from *.
Third Row: Ch 1 to turn, sc in ea st of previous row (in other words, sc in ea dc and in ea dtr, with 3 sc in ea ch-3 space and 4 sc in ea ch-4 space).
Fourth Row: ch 6, * skip 3 sts, dc in next sc, ch 3; repeat from *, with dc over dc of first row.
Fifth Row: Ch 1 to turn, sc in sc, 3 sc in ch-3 space, repeat across row.
To finish: End off. Weave in ends.
For comparison, here's what the 1917 Rose and Edging Directions said, exactly as written and in its entirety - 1917 Rose Directions
Materials: Richardson's R. M. C. Cordonnet No. 80 and a No. 12 hook.
For The Roses: Make 6 ch sts, join, forming a circle, 5 ch sts.
First Row: * 1 d c into circle, 2 ch sts; repeat * for 6 sps, join.
Second Row * 1 s c, 5 d c over sp, 1 s c into d c, forming 1 petal; repeat * for 6 petals.
Third Row: * 5 ch sts, 1 s c back of s c between petals; repeat * for 6 loops.
Fourth Row: * 1 s c, 7 d c, 1 s c into each loop completing rose; break thread. Make enough roses for length required.
Edging (1917 Directions): Make the roses. For the Shamrock, make 18 ch sts, sl st into the 10th st, forming circle.
First Row: 3 s c, 3 d c, 3 t c, sl st to center of petal of rose, 3 t c, 3 d c, 3 s c, all into circle, forming 1st leaf, 10 ch sts, sl st into the 10th st, 3 s c, 3 d c, 6 t c, 3 d c, 3 s c into circle, forming 2nd leaf, repeat first leaf joining to next rose, 8 s c over stem; break thread. Join rose and shamrock alternately for the length required.
Second Row: Join thread to center of petal of rose, 6 ch sts, * 1 d c into next petal, 3 ch sts, 1 d t c, over connection between shamrock and rose, 3 ch sts, 1 d c into center of side of leaf, sl st into end of stem, 3 ch sts, skip 3 sts of stem, sl st into next st, 3 ch sts, 1 d c into center of side of next leaf, 3 ch sts, 1 d t c over connection, 3 ch sts, 1 d c into petal, 3 ch sts; repeat *.
Third Row: 1 sc into each st of previous row.
Fourth Row: 7 ch sts, * skip 3 sts, 1 d c into next s c, 3 ch sts; repeat *, making dc over dc of first row.
Fifth Row: 1 sc into each st of previous row.
- - End of 1917 directions.
Sunday, March 20, 2011

Thursday, March 17, 2011
Happy Saint Patrick's Day Recipe
CORNED BEEF BRISKET
Ingredients
1 (3-pound) corned beef brisket (uncooked), in brine
10 cups cold water
6 cups dark beer
5 bay leaves crushed
2 teaspoons black peppercorns
2 whole allspice berries
2 whole cloves 1 large head green cabbage (about 2 pounds), cut into 8 thick wedges
8 small new potatoes (about 1 1/4 pounds), halved
4 carrots cut in half
Freshly ground black pepper
1 tablespoon pickling spice.
Or
Get the one with the spices already in the package.
How to cook
In a large pot place corn beef, spices ,beer and water and bring to a boil.Then turn down and simmer for 3 hours and 45 mins or until fork slides into meat.
NOTE : Do not boil the meat simmer on low for a fork tender textureTransfer the corned beef to a cutting board and cover tightly with foil to keep warm.
Add the cabbage , potatoes and carrots to the cooking liquid and bring to a boil. Lower the
heat and simmer until the vegetables are tender, about 20 minutes.
Using a slotted spoon, transfer the cabbage to a large platter. Slice the corned beef
across the grain of the meat into thin slices. Lay the slices over the cabbage and
surround it with the potatoes. Ladle some of the hot cooking liquid over the
corned beef and season with pepper. Serve immediately with a mustard or horseradish sauce.
Cook's Note: Leftover corned beef makes great corned beef hash.
Horseradish Sauce:
3/4 cup mayonnaise
3/4 cup sour cream
1/4 cup plus 2 tablespoons jarred grated horseradish (with liquid)
1/2 teaspoon grated lemon zest
2 teaspoons kosher salt
Freshly ground black pepper
In a small bowl, mix together the mayonnaise, sour cream, horseradish,
zest, and 2 teaspoons salt. Season generously with pepper to taste.
Refrigerate the horseradish sauce for at least 30 minutes before serving.
Yield: about 1 3/4 cups

Tuesday, March 15, 2011
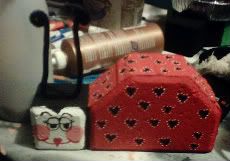
Cute Mothers Day Idea Candy Shoe Box
Found this very cute shoe candy box on a blog.
This would make a great mothers day gift or friends gift anytime to cheer up that special friend.

Monday, March 14, 2011
Flowers From Egg Cartons
Two Kid friendly egg carton projects.
First

Tutorial can be found HERE
Second a simple version.
Make Tulips with Old Egg Cartons
This is an easy project kids can do by themselves or with very little help, and these fs make a great Mother's Day present. Make a bunch for a lovely Spring bouquet!
Kid Tested!
You will need:
Clean cardboard egg cartons
Scissors
Green chenille (pipe cleaners)
Elmer's glue
Paint
Cut the egg carton into separate cups, leaving some of the middle "pop-up" sections. Cut the main cups into the pointed shape of the tulip petals. With the point of the scissors or a sharp pencil, poke a hole in the bottom of each cup. Paint and decorate each cup however you like.
Cut the little center "pop-up" sections between the egg cups into small pointed shapes that will go beneath the tulip cups. Poke a hole in the center of each and paint green.
When the pieces are dry, poke a piece of green chenille through the holes. Tie a loop on the end in the cup so it can't pull back out, and add a dab of glue between the two sections. Shape the chenille into leaf shapes and leave a few inches at the bottom for the stem.
Sunday, March 13, 2011
Paper Daffodils


Saturday, March 12, 2011
Thursday, March 10, 2011
Crochet Slipper Pattern

COATS and CLARK'S O.N.T. "Speed-Cro-Sheen" MERCERIZED COTTON, Art. C.44:2 balls o£ No. 126 Spanish Red and 1 ball each of No. 1 White and No. 12 Black.
Milwards Steel Crochet Hook No. 0.
GAUGE: Sole--6 sc make I inch; 6 rows make 1 inch.
Directions are written for Small Size. Changes for Medium and Large Sizes are in parentheses.
SOLE (Make 2) . . . Starting at center with Red, ch 30 (36-42).
1st rnd: 3 sc in 2nd ch from hook, sc in next 15 (18-21) ch, dc in next 12 (15-18) ch; make 7 dc in last ch (toe end); working along opposite side of starting chain, make dc in next 12 (15-18) ch, sc in next 15 (18-21) ch, 2 sc in same place as first 3 sc were made.
2nd rnd: Sc in each st around, increasing across heel and toe as necessary to keep work flat-- to inc 1 sc, make 2 sc in 1 sc. Repeat 2nd rnd until 8 (8-9) rnds have been completed. At end of last rnd, join and break off.
UPPER . . . Starting at back with Red, make a ch slightly longer than outer edge of sole, having an even number of chains. Join with sl st.
1st rnd: Ch 1, in same place as sl st make sc, ch 3 and sc; * skip next 3 ch, in next ch make sc, ch 3 and sc; skip next 2 ch, in next ch make sc, ch 3 and sc. Repeat from * around. Join to first sc. Break off.
2nd rnd: Attach White to first loop, in each loop around make sc, ch 3 and sc. join to first sc. Break off.
3rd rnd: Attach Black to first loop, work in pattern around. Join. Break off'.
4th rnd: Attach Red to first loop, work in pattern around. Join. Break off.
5th rnd. Repeat 2nd rnd.
6th rnd- Mark the center front (between loops) with a pin, attach Black at back, work in pattern to within 2nd loop preceding marker, dec 1 loop--to dec 1 loop, sc in the next 2 loops, working off these 2 sc as 1 sc--ch 3, sc in same loop, dec 1 loop on opposite side of marker and continue in pattern around. Join and break off.
7th rnd: Attach Red and work as for 6th rnd. Now work in short rows as follows: 1st Row: Mark center front with a pin, mark the 8th loop on each side of pin. Attach White to 8th loop preceding center marker, sc in same loop and work in pattern to within 2nd loop preceding center marker, dec 1 loop, dec another loop on other side of marker, continue in pattern to within last marker, sc in last loop. Break off.
2nd Row: Attach Black to first loop, sc in same loop, work in pattern to within 2nd loop preceding center marker, dec 1 loop, dec another loop on other side of marker, continue in pattern to within last loop, sc in last loop. Break off.
3rd Row: Attach Red to 8th loop preceding center marker on 7th rnd, sc in same place, ch 1, sc in first sc on first short Row, ch 1, sc in first loop on same Row, ch 1, sc in first sc on 2nd Row, ch 1, sc in first loop on same Row, in next loop make sc, ch 3 and sc; dec 1 loop, dec another loop, in next loop make sc, ch 3 and sc; ch 1, sc in next loop, ch 1, sc in last sc, ch 1, sc in last loop on first Row, ch 1, sc in last sc on same Row, ch 1, sc in 8th loop following center marker on 7th rnd. Break off.
Last rnd: Attach Red at back, make 2 sc in each loop to within first short Row, sc in each sc and in each ch 1 to within next loop, make 2 sc in next loop, work off next 2 loops as 1 sc, 2 sc in next loop, sc in each ch 1 and in each sc across short rows, 2 sc in each remaining loop. Join and break off.
Sew soles together. Sew upper to sole. Make another slipper the same way.
Wednesday, March 9, 2011


Monday, March 7, 2011
Bread Dough Roses
Design by Oak Leaf Studio

Materials Needed:
4 tbsp Aleene's Tacky Glue (Gold bottle, use silver bottle for a porcelain look.)
4 slices white bread NO CRUSTS.
4 tbsp Corn Starch.
2 tbsp Cold Cream
2 tsp Lemon juice
2 tbsp White acrylic paint. (you can use any color you like, but some have more pigment. To get the color you want you will have to experiment with the amount to add)
Procedure:
Mix all together in container until it begins to stick together.
Empty out on a board and knead until smooth.
Wrap in Saran wrap and store in fridge.
Use as clay. Cut with cookie cutters, sculpt with it, make beads - anything you like!
Air dry. Do not bake.
Finished articles can be painted and varnished.
This recipe will keep for ages. I tested a ball wrapped in Saran and kept in the fridge, after two months it was still as good as new.
Add the colour as it is more pleasing to work with and also makes a good base for painting.
Sunday, March 6, 2011

Saturday, March 5, 2011
Winter In Oregon
It's winter in Oregon
And the gentle breezes blow,
40 miles per hour at 10 degrees!
Oh, how I love Oregon,
When the snow's up to your butt;
You take a breath of winter air
And your nose is frozen shut.
Yes, the weather here is wonderful,
You may think I'm a fool.
I could never leave Oregon,
Cause I'm frozen to the stool

Pipe cleaner roses made by Donna

Pipe cleaner roses so easy by Donna
Tutorial found HERE
Turn a basic pipe cleaner into a charming cocktail ring -- the perfect present for bridesmaids and flower girls -- using this simple process from Wendy Baner.
Tools and Materials
- Six pipe cleaners in color of desired rose
- One green pipe cleaner
Ring How-To1. Group six pipe cleaners with ends even, and twist in the middle about 5 times to create something that looks like whiskers.
2. Put the twist under the intended ring finger and cross the "whiskers" over the top of the finger to measure the ring size. Remove pipe cleaners from finger and twist to size.
3. Open and spread out the "legs." Make a very tiny bend on the end of each leg, pressing back onto itself. Start rolling each leg from the bend into the center, pulling back as you roll to make the roll as tight as possible.
4. Arrange each rolled "petal" of the rose. Begin by turning the two innermost rolls to face each other, and work outward, arranging and organizing the petals until you are happy with the rose's shape.
5. To add a leaf, twist a green pipe cleaner around the top of the ring, where it meets the flower. Roll each leg of the green pipe cleaner into the center as you did for the rose. Pinch the outside of each roll to give it a leaf shape.

Thursday, March 3, 2011


Tuesday, March 1, 2011

Monday, February 28, 2011
Sunday, February 27, 2011
PomPoms
MAKE THE PERFECT
POM POM
(Basic Finger Directions)
Forget about expensive store bought pom poms. Make your own. Here's how:
Start with some nice orlon acrylic yarn like Red Heart Super Saver Yarn
Wrap the yarn around your 2nd and 3rd fingers about fifty times.
Slide yarn off your fingers and tie it tightly in the middle with a small piece of yarn.
Take sharp scissors and trim off the edges, cutting all the loops.
When you're done you should have a pom pom about 3/4" to 1" in diameter. For larger pom poms use more wraps and three fingers. Experiment to find your perfect formula. Use the pom poms to create all kinds of animals, ornaments and other craft items.
Can also use a cardboard piece or a round wood disk.
Projects tutorials found HERE Lots of Pom Pom animals to make.
Friday, February 25, 2011

Thursday, February 24, 2011
The Lady bug
Needed
Half brick paver
Half a 6 sided paver
Red, black & white acrylic paint
Black chenille stems or twisted wires
E6000 glue
Acrylic spray sealer
Paint body of paver red. Let dry.
Paint "head" black & let dry.
Paint face white & let dry
Repeat painting.
Paint black spots on body. Highlight with white when dry.
Spray with acrylic sealer....2-3 coats.
Paint on eyes on eyes in black
Paint on checks with red and white mixed paint to make pink
Paint lips in red
When dry spray on sealer.
Glue on antenna
The Bee
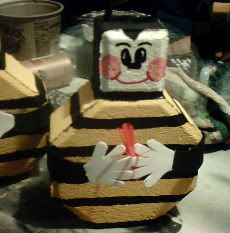
Thanks so much to Donna over at the chat board
Tuesday, February 8, 2011
Cupid Poop Poem

Cupid Poop
Put some of those cinnamon red hot heart shaped candies in a zip lock bag and give with this poem attached:
---------------------
I couldn't send you fs, and candy wouldn't do.
And mushy cards just didn't say the things I want them to.
So I got you something special, and here's the inside scoop.
I found you something very rare - It's genuine Cupid poop!
Rock Painting for the Kids

It’s a blast from the past with '70s-style rock art that combines color, shape and texture. Cathie Filian and Steve Piacenza are full of crafty ideas guaranteed to rock your world! Planet Earth is the inspiration for amazing pebble paintings, stepping stones receive a personal touch, and paperweights and lucky bamboo bring a Zen presence to any desk.
Materials and Tools:
1/4" thick plywood (cut to desired size)
3/4" thick molding (enough to go around the plywood)
saw
miter box
wood putty
putty knife
wood embroidery hoops (different sizes to fit the design)
small aquarium pebbles (different colors)
natural pebbles
E6000 glue
large amount of Mod-Podge or other découpage medium
craft paint
paintbrushes
finishing nails and hammer
picture hanger
Steps:
1. Using a saw and miter box, cut mitered edges into the molding to create a frame for the plywood. Attach the molding to the outside edges of the plywood with finishing nails.
2. Fill any gaps between the plywood and the frame with wood putty. Next, apply a small amount of putty around the perimeter of the plywood where it meets the molding frame and let dry.
3. Paint the frame and plywood interior a color that will match the rocks. Based on the design pattern, paint each of the inside hoops with craft paint and let dry.
4. Place the hoops on the plywood according to the pattern and glue in place. If desired, cut the hoops apart, remove a section and place the hoops in an interlocking pattern with another hoop.
5. Fill the hoops with colored aquarium rocks. Fill the remainder of the plywood base with natural pebbles.
6. Pour découpage medium over the surface of the artwork. Brush the medium evenly over the frame to create a uniform sheen.
7. Let the découpage medium dry flat for 2 weeks. Attach a picture hanger to the back to hang or use flat as table decor. If hanging on the wall, use an anchor to support the weight.
Check out all the great projects
From DIY http://www.diynetwork.com/decorating/a-blast-of-rock-art/index.html
Sunday, February 6, 2011

Sunday, January 30, 2011
Eggs are fast Rolling
 This is a pretty mosaic egg found over at instructables.
Great they way it is !
Now combine this with the glue egg and I bet you would have a great egg display item.
Saturday, January 29, 2011
Bottle Cap Hot Plate Mat

A unique hot plate mat which looks like a bunch of grapes may be hung on the wall as a plaque when not in use on the table. Bottle caps are covered with crochet and sewed together, leaves and a loop stem are added, making a gift or bazaar item. Use string weight thread and size 7 or g crochet hook. Make grapes in purple, leaves and stem green.
In purple ch 6, join in first ch to form a ring.
Row 1: Ch 3, make 19 dc in ring.
Rnd 2: Rnd 2: Working in back lps of sts only ch 3, dc in same place, 2 dc in of next 19 dc, join with sl st in third ch of ch 3 first made.
Rnd 3: Ch 3, dc in each of the 39 dc around. Join with a sl st in third of ch 3 first made. Place this over a bottle cap and work next Row.
Rnd 4: Ch 3, * sk 2 dc, dc in next dc, repeat from * 12 times, join and fasten off.
This complete one. Make 12 more covers in the same manner. Arrange as shown in sketch and sew together.
Stem-Fasten green thread at top of middle bottle cap and ch 30. Sl st in same space. Fill ch lp with sc.
Leaf-In green ch 4, 3 sc in second st from hook, 5 dc in next st of ch, 3 sc in last st, ch 1 to turn all rows.
Row 2: 3 sc in first sc, sc in each of next 9 sc, 3 sc in last sc.
Row 3: Sc in each st.
Row 4: 2 sc in first sc, sc in each of next 13 sc, 2 sc in last sc.
Row 5: Sc in each st.
Row 6, 7: 2 sc in first sc, sc in each remaining sc.
Row 8: 2 sc in first sc, sc in each of next 16 sc, 2 sc in last sc.
Row 9: 2 sc in first sc, sc in each of next 17 sc, 2 sc in next sc.
Row 10: 3 sc in first sc, sc in each sc across, 2 sc in last sc.
Rows 11, 12: Repeat rnd 10.
Row 13: 3 sc in first sc, sc in each of next 21 sc.
Row 14: Sk 1 sc, sc in each of next 15 sc, 2 sc in next sc.
Row 15: 2 sc in first sc, sc in each of next 13 sc, 2 sc in next sc.
Row 16: 2 sc in first sc, sc in each sc across.
Next 3 rows: Dec 1 st in first and last sc, sc in each sc between.
Row 20: Sk first sc, dec in next 2 sts, sc in each of next 6 sc, dec in next 2 sts.
Row 21: Sk first sc, dec in next 2 sts, sc in each of next 3 sc, dec in next 2 sts.
Row 22: Work 1 Row even.
Row 23: * Dec in next 2 sts, repeat from * across.
Row 24: Dec in first 2 sts, fasten off.
Each side of leaf is shaped by the decreasing. This completes one.
Make 2 leaves.
Sew leaves to the bunch of grapes and stem as shown in the illustration.
Thursday, January 27, 2011


Sunday, January 23, 2011

Thursday, January 20, 2011
Monday, January 17, 2011
Way Past Christmas
Yes I know it is way past Christmas.
But I was ill over the holiday and still wanted to post.
These are my handmade.
Some of these are 40 years old and the patterns long gone, but still cute just the same. Most were gifts from my mother but my favorites are the walnut shells.
The Eskimo and Snow people are walnut with filbert heads.
The Dolls are clothespins and cork.
The beads are created around small mirrors.
The snowman is wooden dowels and buttons.
I see on etsy they are back with a modern twist.
Would love to see your handmade and post on the site with any patterns or tips and your name.


Friday, January 14, 2011
Crochet Hens and chicks

Materials Required—The following AMERICAN THREAD COMPANY Products:
15" HEN. "DAWN" KNITTING WORSTED. 1 ¼-oz. Skeins. 4 Skeins Red and 2 Skeins White. Bone Crochet Hook No. 5. (Worked single yarn.)
8" HEN. "DE LUXE" MERCERIZED CROCHET AND KNITTING COTTON. 1 400-yd. Ball White and 2 250-yd. Balls Red will make 2 hens. Steel Crochet Hook No 7. (Worked single thread.)
¾ yd. Ribbon for each Hen.
Cotton or Kapok for filling.
BABY CHICKS. "DAWN" KNITTING WORSTED. 1 ¼-oz. Skeins, White or Yellow. 1 Skein will make 2 chicks. 1 ¼ yds. Red for each bill. 1 Ball "Star" Pearl Cotton Size 5, Yellow will make feet for 6 chicks. Steel Crochet Hook No. 4.
2 Buttons for each Hen and Chick.
HEN. Right side—With Red, ch 23, insert needle in 3rd st from hook and pull loop through, skip 1 st of ch, insert needle in next st, and pull loop through, yarn over and pull through all 3 loops on needle, * ch 1, insert needle in same space with last st, pull loop through, skip 1 st of ch, insert needle in next st, pull loop through, yarn over, and pull through all 3 loops on needle, repeat from * to end of row, ch 3, turn (10 patterns). 2nd Row—Insert needle in 3rd st from hook and pull loop through, skip 1 st, insert needle in next st, pull loop through, yarn over and pull through all 3 loops on needle, * ch 1, insert needle in same space with last st, pull loop through, skip 1 st, insert needle in next st, pull loop through, yarn over and pull through all 3 loops on needle, repeat from * to end of row, ch 3, turn. Repeat 2nd row once. (Ch 2 to turn all decrease rows.) 4th Row—Decrease 1 pattern at the beginning of row, work in pattern even across remainder of row. (To decrease: skip 1 st, s c in next st.) Repeat the 4th row twice, then work 4 more rows even. 11th Row—Increase 1 pattern at the beginning of row. (Increase: insert needle in 3rd st from hook, pull loop through, insert needle in next st, pull loop through, yarn over and pull through all loops on needle, ch 1, insert needle in same space with last st, pull loop through, insert needle in next st, pull loop through, yarn over and pull through all loops on needle, ch 1.) Work even across remainder of row. Re¬peat the 11th row 12 times. 24th Row—Work even. 25th Row—Increase 1 pattern at the beginning of row. Repeat the last 2 rows twice, then work 4 rows even. 34th Row—Decrease 1 pattern at the beginning of row and work 1 row even. 36th Row—Start Head—Work 11 patterns, ch 3, turn, work 2 rows even. 39th and 40th Rows—Increase 1 pattern at the beginning of each row, then work 8 rows even. 49th to 53rd Rows—Decrease 1 pattern at the beginning of each row, break yarn. Attach yarn at back of neck and work in pattern to end of row, ch 3, turn. Start Tail—Work 7 patterns, ch 2, turn. Decrease 1 pattern at beginning of row, work 6 patterns, ch 2, turn. Decrease 1 pattern at be¬ginning of row and work 5 patterns, then work 1 row of s c all around section working 1 s c in each pattern and 1 s c in each row with 2 s c at feet corners and at tail tip, break yarn. Work another section in same manner.
UNDER SECTION. With White, ch 7, work 2 patterns on ch, ch 3, turn. 2nd Row—Increase 2 patterns, (4 patterns in row) ch 3, turn. 3rd to 10th Rows—Increase 1 pattern at the beginning of each row, then work 3 rows even. Next 2 rows—Decrease 1 pattern at the beginning of each row. 16th to 24th Rows—Work even. Next 6 Rows—Increase 1 pattern at the beginning of each row. 30th to 40th Rows—Work even. 41st to 50th Rows—Decrease 1 pattern at the beginning of each row, then work 2 rows even. 53rd to 57th Rows—Increase 1 pattern at the beginning of each row. Work 24 more rows even, then decrease 1 pattern at the beginning of each row until 1 pattern remains. Work 1 row of s c all around, 1 s c in each row, break yarn.
UNDER SECTION FOR LEG. With Red, work 2 sec¬tions following the first 11 rows of right side, then work 1 row of s c all around.
WINGS, COMB AND TAIL. With Red, ch 21 and work 20 s c on ch, ch 1, turn, working remainder in back loop of st only, 1 s c in each of the next 19 s c, ch 3, turn, 1 s c in first st of ch 3, 1 s c in each of the next 5 s c, * ch 1, turn, 1 s c in each of the next 4 s c, ch 3, turn, 1 s c in first st of ch 3, 1 s c in each of the next 4 s c, 1 s c in each of the next 2 s c on base, repeat from * 7 times, working the last 2 s c over the 2 rows of base, break yarn and work 7 more Red and 6 White sections in same manner.
BILL. With Red, ch 9 and work 8 s c on ch, ch 1 to turn each row. Work 5 more rows of s c even, then decrease 1 s c at the beginning of each row until 2 sts remain. Work 1 row of s c all around, break yarn. Work 1 more section in Red and 1 section in White.
TO ASSEMBLE HEN. Sew the under section for leg to lower edge of side section, starting at the 12th row. Sew other under section to other side in same manner. Sew tail together for about 14 rows starting at straight part of back at lower edge of neck. Sew under section in position starting at about the 26th row at tail and 1st row of under section working down to 12th row, then sew to under section of leg, up front and around head. Sew other side to correspond leaving enough opening for filling. Stuff with cotton or Kapok and sew remainder.
COMB. Sew 2 Red and 1 White section together and sew to top of head as illustrated.
TAIL. Sew 2 Red and 1 White section together and sew to tail as illustrated. Sew 2 White and 2 Red Sections on each side for wings as illustrated.
BILL. Sew 1 White and 2 Red sections together and sew to front of face as illustrated. Sew eyes in position.
BABY CHICKS
BODY. With White, over a 3 inch cardboard wind wool 100 times, slip from cardboard and tie through center, leaving about 5 inches of thread.
HEAD. Over a 2 inch cardboard wind wool 75 times, slip from cardboard and tie through center leaving about 5 inches of thread.
BILL. With Red, ch 8, 2 s c in second st from hook, 1 s c in each of the next 5 sts of ch, 2 s c in next st, working on opposite side of ch, 1 s c in each st of ch. Join and break yarn.
LEGS. With Yellow "Star" Pearl Cotton, using double thread, ch 6 join, ch 1 and without joining rows, working in the back loop of st only, work 1 s c in each s c, until work measures about 1 inch.
FEET. * Ch 4, turn, work 3 s c on ch, s c in same space with ch 4, s c in next s c, repeat from * twice, then ch 2, s c in second st from hook, s c in same space with ch 2, s c in next s c, break thread. Work another leg in same manner.
TO MAKE CHICKS. Trim pompons to shape body and head, tie head and body threads together. Sew eyes and legs in position. Fold Bill in half and sew in position. Comb Body and Head to fluff.
Wednesday, January 12, 2011
Crochet Horse Vintage Pattern

Materials Required—The following AMERICAN THREAD COMPANY Products:
9 ½" HORSE. (Top of head to feet) "STAR" PEARL COTTON, Size 5. 60 yd. Balls. 8 Balls White and 1 Ball Red. Steel Crochet Hooks No. 4 and 8. Work with two strands of thread.
13 ½" HORSE. "DAWN" KNITTING WORSTED, 1 ¼ oz. Skeins. 4 Skeins Brown and 1 Skein Tangerine or Orange. Bone Crochet Hooks No. 3 and 6. Work with single yarn.
Cotton or Kapok for filling.
17 ½" HORSE. "STAR" COTTON YARN, 100 yd. Skeins. 7 Skeins Black and 1 Skein White. Crochet Hooks No. 6 and G. Work with double yarn.
BODY. With White and Large Hook ch 38 and work 37 s c on ch. Ch 1 to turn each row. 2nd and 3rd Rows—2 s c in first s c, 1 s c in each remaining s c. 4th and 5th Rows—1 s c in each s c. 6th Row—Increase 1 s c at beginning of row and work 2 rows even. 9th and 10th Rows—Increase 1 s c at beginning of each row. 11th Row—Increase 1 s c at beginning of row and work 4 rows even. 16th, 17th and 18th Rows—Decrease 1 s c at beginning of each row. 19th Row—Start Neck—Work 1 s c in each of the first 17 s c, ch 1, turn. 20th Row—Decrease 1 s c at beginning of row, 1 s c in each remaining s c of neck. 21st Row—1 s c in each s c. Repeat the 20th and 21st rows 3 times. 28th Row—Decrease 1 s c at beginning of row, 1 s c in each remaining s c, ch 12 for head, turn. 29th Row—11 s c on ch, 1 s c in each s c of neck. Next 14 Rows—Decrease 1 s c at beginning of each row, break thread.
LOWER SECTION OF FACE. Attach thread at neck edge in the 28th row and in the first st of the ch 12 and work 1 s c in each of the next 10 sts of ch, 2 s c in last st, ch 1, turn and work 3 more rows even. 5th Row—Decrease 1 s c at beginning of row and work 1 row even. Next 4 Rows—Decrease 1 s c at beginning of each row, break thread. Attach thread in first s c of 18th row and work 1 s c in each of the next 14 s c, ch 1, turn. Decrease 1 s c and work 1 s c in each of the next 13 s c, ch 1, turn, decrease 1 s c and work 1 s c in each of the next 12 s c, then work 1 s c in each s c across back, 1 s c in each row of neck, 1 s c in each s c at top of head, continue working around head and down the front to the first row without breaking thread.
START FRONT LEG. 2 s c in first s c of opposite side of ch 38, 1 s c in each of next 8 sts, ch 1, turn. 2nd Row—Decrease 1 s c, 1 s c in each of the next 9 s c. 3rd Row—Increase 1 s c at beginning of row. 4th Row—Decrease 1 s c at beginning of row. Repeat the 3rd and 4th rows 3 times. 11th Row—1 s c in each s c. 12th Row—Decrease 1 s c at beginning of row. Repeat 11th and 12th rows 3 times, then work 6 more rows even, break thread.
HIND LEG. Attach thread in 13th st from end of row, work 1 s c in each of the next 12 sts, ch 1, turn, and work 2 rows even. 4th Row—Increase 1 s c at beginning of row, 1 s c in each remaining s c. 5th Row— Decrease 1 s c at beginning of row, 1 s c in each remaining s c. Repeat the 4th and 5th rows once and work 1 row even. Next 8 Rows—Decrease 1 s c at beginning of each row and work 10 more rows even, break thread. Attach thread at top of head at face, work 1 s c in each of the s c of top of head to back of neck, ch 1, turn. Work 1 s c in each s c across top of head, down front of face, around mouth and up to under neck, ch 1, turn. Work 1 more row of s c all around head then work about 5 s c down back of neck, break thread. Work another section in the same manner.
UNDER SECTION. Work 2 under sections following the first 5 rows of body. Then work front and hind leg on each section.
EARS. Ch 2, 1 s c in first st, ch 1 to turn. 2nd Row—2 s c in s c. 3rd Row—2 s c in first s c, 1 s c in next s c. Work 8 more rows increasing 1 s c at beginning of each row, then work 1 s c in each row down one side, 3 s c in the first st, 1 s c in each row up opposite side, break thread.
TAIL. Ch 6, join and work 1 s c in each st, without joining rows and working in back loop of st only work 1 s c in each s c for 14 rows.
FRINGE. * Draw up a loop on hook about 3 inches or length desired, hold loop on hook, s c in next s c, draw up another loop on hook, s c in same s c, draw up another loop on hook, s c in next s c, repeat from * twice. Work a few loops in same manner in about 3 or 4 rows for under part of tail, break thread. Cut loops.
MANE. Ch 51 and work 50 s c on ch, then work fringe same as tail fringe.
BLANKET. With 1 strand of Red and Small Hook ch 46 and work 45 s c on ch. 2nd Row—Ch 3, turn, * 2 d c in same space with ch 3, skip 3 s c, s c in next s c, ch 3, repeat from * across row. (Ch 3 to turn each row.) 3rd Row—2 d c in same space with ch 3, s c over the ch 3 of shell, * ch 3, 2 d c in same space, s c over the ch 3 of next shell, repeat from * across row. Attach White and work 1 row of White, 2 rows of Red, 1 row of White, 2 rows of Red, then work 1 row of shells all around blanket. Work a band of 2 shells to fit around horse.
TO ASSEMBLE HORSE. Lay the under sections on body sections matching legs. Sew around both legs and to body, then place both body sections together, leav-ing center of under section open for filling. Fill and sew together. Sew Tail, Ears and Blanket in position. Fold Mane in half, cut loops and sew in position. Embroider eyes or use buttons sewed into a small piece of white felt.
BRIDLE AND REINS are made to fit. Using a single strand of Red, make a ch long enough to fit around mouth, join and work a row of s c on ch. The Bit is a ch to fit from one side of band in mouth and attached to opposite side. Work a band around head, across front of head and reins made of 2 rows of s c, break thread.


Monday, January 10, 2011


Sunday, January 9, 2011

Thursday, January 6, 2011

Subscribe to:
Posts (Atom)