
Saturday, March 12, 2011
Thursday, March 10, 2011
Crochet Slipper Pattern

COATS and CLARK'S O.N.T. "Speed-Cro-Sheen" MERCERIZED COTTON, Art. C.44:2 balls o£ No. 126 Spanish Red and 1 ball each of No. 1 White and No. 12 Black.
Milwards Steel Crochet Hook No. 0.
GAUGE: Sole--6 sc make I inch; 6 rows make 1 inch.
Directions are written for Small Size. Changes for Medium and Large Sizes are in parentheses.
SOLE (Make 2) . . . Starting at center with Red, ch 30 (36-42).
1st rnd: 3 sc in 2nd ch from hook, sc in next 15 (18-21) ch, dc in next 12 (15-18) ch; make 7 dc in last ch (toe end); working along opposite side of starting chain, make dc in next 12 (15-18) ch, sc in next 15 (18-21) ch, 2 sc in same place as first 3 sc were made.
2nd rnd: Sc in each st around, increasing across heel and toe as necessary to keep work flat-- to inc 1 sc, make 2 sc in 1 sc. Repeat 2nd rnd until 8 (8-9) rnds have been completed. At end of last rnd, join and break off.
UPPER . . . Starting at back with Red, make a ch slightly longer than outer edge of sole, having an even number of chains. Join with sl st.
1st rnd: Ch 1, in same place as sl st make sc, ch 3 and sc; * skip next 3 ch, in next ch make sc, ch 3 and sc; skip next 2 ch, in next ch make sc, ch 3 and sc. Repeat from * around. Join to first sc. Break off.
2nd rnd: Attach White to first loop, in each loop around make sc, ch 3 and sc. join to first sc. Break off.
3rd rnd: Attach Black to first loop, work in pattern around. Join. Break off'.
4th rnd: Attach Red to first loop, work in pattern around. Join. Break off.
5th rnd. Repeat 2nd rnd.
6th rnd- Mark the center front (between loops) with a pin, attach Black at back, work in pattern to within 2nd loop preceding marker, dec 1 loop--to dec 1 loop, sc in the next 2 loops, working off these 2 sc as 1 sc--ch 3, sc in same loop, dec 1 loop on opposite side of marker and continue in pattern around. Join and break off.
7th rnd: Attach Red and work as for 6th rnd. Now work in short rows as follows: 1st Row: Mark center front with a pin, mark the 8th loop on each side of pin. Attach White to 8th loop preceding center marker, sc in same loop and work in pattern to within 2nd loop preceding center marker, dec 1 loop, dec another loop on other side of marker, continue in pattern to within last marker, sc in last loop. Break off.
2nd Row: Attach Black to first loop, sc in same loop, work in pattern to within 2nd loop preceding center marker, dec 1 loop, dec another loop on other side of marker, continue in pattern to within last loop, sc in last loop. Break off.
3rd Row: Attach Red to 8th loop preceding center marker on 7th rnd, sc in same place, ch 1, sc in first sc on first short Row, ch 1, sc in first loop on same Row, ch 1, sc in first sc on 2nd Row, ch 1, sc in first loop on same Row, in next loop make sc, ch 3 and sc; dec 1 loop, dec another loop, in next loop make sc, ch 3 and sc; ch 1, sc in next loop, ch 1, sc in last sc, ch 1, sc in last loop on first Row, ch 1, sc in last sc on same Row, ch 1, sc in 8th loop following center marker on 7th rnd. Break off.
Last rnd: Attach Red at back, make 2 sc in each loop to within first short Row, sc in each sc and in each ch 1 to within next loop, make 2 sc in next loop, work off next 2 loops as 1 sc, 2 sc in next loop, sc in each ch 1 and in each sc across short rows, 2 sc in each remaining loop. Join and break off.
Sew soles together. Sew upper to sole. Make another slipper the same way.
Wednesday, March 9, 2011


Monday, March 7, 2011
Bread Dough Roses
Design by Oak Leaf Studio

Materials Needed:
4 tbsp Aleene's Tacky Glue (Gold bottle, use silver bottle for a porcelain look.)
4 slices white bread NO CRUSTS.
4 tbsp Corn Starch.
2 tbsp Cold Cream
2 tsp Lemon juice
2 tbsp White acrylic paint. (you can use any color you like, but some have more pigment. To get the color you want you will have to experiment with the amount to add)
Procedure:
Mix all together in container until it begins to stick together.
Empty out on a board and knead until smooth.
Wrap in Saran wrap and store in fridge.
Use as clay. Cut with cookie cutters, sculpt with it, make beads - anything you like!
Air dry. Do not bake.
Finished articles can be painted and varnished.
This recipe will keep for ages. I tested a ball wrapped in Saran and kept in the fridge, after two months it was still as good as new.
Add the colour as it is more pleasing to work with and also makes a good base for painting.
Sunday, March 6, 2011

Saturday, March 5, 2011
Winter In Oregon
It's winter in Oregon
And the gentle breezes blow,
40 miles per hour at 10 degrees!
Oh, how I love Oregon,
When the snow's up to your butt;
You take a breath of winter air
And your nose is frozen shut.
Yes, the weather here is wonderful,
You may think I'm a fool.
I could never leave Oregon,
Cause I'm frozen to the stool

Pipe cleaner roses made by Donna

Pipe cleaner roses so easy by Donna
Tutorial found HERE
Turn a basic pipe cleaner into a charming cocktail ring -- the perfect present for bridesmaids and flower girls -- using this simple process from Wendy Baner.
Tools and Materials
- Six pipe cleaners in color of desired rose
- One green pipe cleaner
Ring How-To1. Group six pipe cleaners with ends even, and twist in the middle about 5 times to create something that looks like whiskers.
2. Put the twist under the intended ring finger and cross the "whiskers" over the top of the finger to measure the ring size. Remove pipe cleaners from finger and twist to size.
3. Open and spread out the "legs." Make a very tiny bend on the end of each leg, pressing back onto itself. Start rolling each leg from the bend into the center, pulling back as you roll to make the roll as tight as possible.
4. Arrange each rolled "petal" of the rose. Begin by turning the two innermost rolls to face each other, and work outward, arranging and organizing the petals until you are happy with the rose's shape.
5. To add a leaf, twist a green pipe cleaner around the top of the ring, where it meets the flower. Roll each leg of the green pipe cleaner into the center as you did for the rose. Pinch the outside of each roll to give it a leaf shape.

Thursday, March 3, 2011


Tuesday, March 1, 2011

Monday, February 28, 2011
Sunday, February 27, 2011
PomPoms
MAKE THE PERFECT
POM POM
(Basic Finger Directions)
Forget about expensive store bought pom poms. Make your own. Here's how:
Start with some nice orlon acrylic yarn like Red Heart Super Saver Yarn
Wrap the yarn around your 2nd and 3rd fingers about fifty times.
Slide yarn off your fingers and tie it tightly in the middle with a small piece of yarn.
Take sharp scissors and trim off the edges, cutting all the loops.
When you're done you should have a pom pom about 3/4" to 1" in diameter. For larger pom poms use more wraps and three fingers. Experiment to find your perfect formula. Use the pom poms to create all kinds of animals, ornaments and other craft items.
Can also use a cardboard piece or a round wood disk.
Projects tutorials found HERE Lots of Pom Pom animals to make.
Friday, February 25, 2011

Thursday, February 24, 2011
The Lady bug
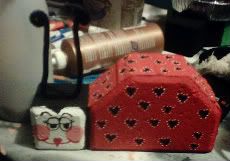
Needed
Half brick paver
Half a 6 sided paver
Red, black & white acrylic paint
Black chenille stems or twisted wires
E6000 glue
Acrylic spray sealer
Paint body of paver red. Let dry.
Paint "head" black & let dry.
Paint face white & let dry
Repeat painting.
Paint black spots on body. Highlight with white when dry.
Spray with acrylic sealer....2-3 coats.
Paint on eyes on eyes in black
Paint on checks with red and white mixed paint to make pink
Paint lips in red
When dry spray on sealer.
Glue on antenna
The Bee
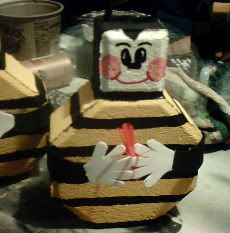
Thanks so much to Donna over at the chat board
Tuesday, February 8, 2011
Cupid Poop Poem

Cupid Poop
Put some of those cinnamon red hot heart shaped candies in a zip lock bag and give with this poem attached:
---------------------
I couldn't send you fs, and candy wouldn't do.
And mushy cards just didn't say the things I want them to.
So I got you something special, and here's the inside scoop.
I found you something very rare - It's genuine Cupid poop!
Rock Painting for the Kids

It’s a blast from the past with '70s-style rock art that combines color, shape and texture. Cathie Filian and Steve Piacenza are full of crafty ideas guaranteed to rock your world! Planet Earth is the inspiration for amazing pebble paintings, stepping stones receive a personal touch, and paperweights and lucky bamboo bring a Zen presence to any desk.
Materials and Tools:
1/4" thick plywood (cut to desired size)
3/4" thick molding (enough to go around the plywood)
saw
miter box
wood putty
putty knife
wood embroidery hoops (different sizes to fit the design)
small aquarium pebbles (different colors)
natural pebbles
E6000 glue
large amount of Mod-Podge or other découpage medium
craft paint
paintbrushes
finishing nails and hammer
picture hanger
Steps:
1. Using a saw and miter box, cut mitered edges into the molding to create a frame for the plywood. Attach the molding to the outside edges of the plywood with finishing nails.
2. Fill any gaps between the plywood and the frame with wood putty. Next, apply a small amount of putty around the perimeter of the plywood where it meets the molding frame and let dry.
3. Paint the frame and plywood interior a color that will match the rocks. Based on the design pattern, paint each of the inside hoops with craft paint and let dry.
4. Place the hoops on the plywood according to the pattern and glue in place. If desired, cut the hoops apart, remove a section and place the hoops in an interlocking pattern with another hoop.
5. Fill the hoops with colored aquarium rocks. Fill the remainder of the plywood base with natural pebbles.
6. Pour découpage medium over the surface of the artwork. Brush the medium evenly over the frame to create a uniform sheen.
7. Let the découpage medium dry flat for 2 weeks. Attach a picture hanger to the back to hang or use flat as table decor. If hanging on the wall, use an anchor to support the weight.
Check out all the great projects
From DIY http://www.diynetwork.com/decorating/a-blast-of-rock-art/index.html
Sunday, February 6, 2011

Sunday, January 30, 2011
Eggs are fast Rolling
 This is a pretty mosaic egg found over at instructables.
Great they way it is !
Now combine this with the glue egg and I bet you would have a great egg display item.
Saturday, January 29, 2011
Bottle Cap Hot Plate Mat

A unique hot plate mat which looks like a bunch of grapes may be hung on the wall as a plaque when not in use on the table. Bottle caps are covered with crochet and sewed together, leaves and a loop stem are added, making a gift or bazaar item. Use string weight thread and size 7 or g crochet hook. Make grapes in purple, leaves and stem green.
In purple ch 6, join in first ch to form a ring.
Row 1: Ch 3, make 19 dc in ring.
Rnd 2: Rnd 2: Working in back lps of sts only ch 3, dc in same place, 2 dc in of next 19 dc, join with sl st in third ch of ch 3 first made.
Rnd 3: Ch 3, dc in each of the 39 dc around. Join with a sl st in third of ch 3 first made. Place this over a bottle cap and work next Row.
Rnd 4: Ch 3, * sk 2 dc, dc in next dc, repeat from * 12 times, join and fasten off.
This complete one. Make 12 more covers in the same manner. Arrange as shown in sketch and sew together.
Stem-Fasten green thread at top of middle bottle cap and ch 30. Sl st in same space. Fill ch lp with sc.
Leaf-In green ch 4, 3 sc in second st from hook, 5 dc in next st of ch, 3 sc in last st, ch 1 to turn all rows.
Row 2: 3 sc in first sc, sc in each of next 9 sc, 3 sc in last sc.
Row 3: Sc in each st.
Row 4: 2 sc in first sc, sc in each of next 13 sc, 2 sc in last sc.
Row 5: Sc in each st.
Row 6, 7: 2 sc in first sc, sc in each remaining sc.
Row 8: 2 sc in first sc, sc in each of next 16 sc, 2 sc in last sc.
Row 9: 2 sc in first sc, sc in each of next 17 sc, 2 sc in next sc.
Row 10: 3 sc in first sc, sc in each sc across, 2 sc in last sc.
Rows 11, 12: Repeat rnd 10.
Row 13: 3 sc in first sc, sc in each of next 21 sc.
Row 14: Sk 1 sc, sc in each of next 15 sc, 2 sc in next sc.
Row 15: 2 sc in first sc, sc in each of next 13 sc, 2 sc in next sc.
Row 16: 2 sc in first sc, sc in each sc across.
Next 3 rows: Dec 1 st in first and last sc, sc in each sc between.
Row 20: Sk first sc, dec in next 2 sts, sc in each of next 6 sc, dec in next 2 sts.
Row 21: Sk first sc, dec in next 2 sts, sc in each of next 3 sc, dec in next 2 sts.
Row 22: Work 1 Row even.
Row 23: * Dec in next 2 sts, repeat from * across.
Row 24: Dec in first 2 sts, fasten off.
Each side of leaf is shaped by the decreasing. This completes one.
Make 2 leaves.
Sew leaves to the bunch of grapes and stem as shown in the illustration.
Subscribe to:
Posts (Atom)