MAKE THE PERFECT
POM POM
(Basic Finger Directions)
Forget about expensive store bought pom poms. Make your own. Here's how:
Start with some nice orlon acrylic yarn like Red Heart Super Saver Yarn
Wrap the yarn around your 2nd and 3rd fingers about fifty times.
Slide yarn off your fingers and tie it tightly in the middle with a small piece of yarn.
Take sharp scissors and trim off the edges, cutting all the loops.
When you're done you should have a pom pom about 3/4" to 1" in diameter. For larger pom poms use more wraps and three fingers. Experiment to find your perfect formula. Use the pom poms to create all kinds of animals, ornaments and other craft items.
Can also use a cardboard piece or a round wood disk.
Projects tutorials found HERE Lots of Pom Pom animals to make.

Sunday, February 27, 2011
Friday, February 25, 2011

Thursday, February 24, 2011
The Lady bug
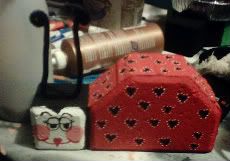
Needed
Half brick paver
Half a 6 sided paver
Red, black & white acrylic paint
Black chenille stems or twisted wires
E6000 glue
Acrylic spray sealer
Paint body of paver red. Let dry.
Paint "head" black & let dry.
Paint face white & let dry
Repeat painting.
Paint black spots on body. Highlight with white when dry.
Spray with acrylic sealer....2-3 coats.
Paint on eyes on eyes in black
Paint on checks with red and white mixed paint to make pink
Paint lips in red
When dry spray on sealer.
Glue on antenna
The Bee
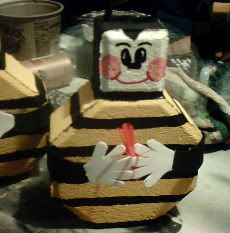
Thanks so much to Donna over at the chat board
Tuesday, February 8, 2011
Cupid Poop Poem

Cupid Poop
Put some of those cinnamon red hot heart shaped candies in a zip lock bag and give with this poem attached:
---------------------
I couldn't send you fs, and candy wouldn't do.
And mushy cards just didn't say the things I want them to.
So I got you something special, and here's the inside scoop.
I found you something very rare - It's genuine Cupid poop!
Rock Painting for the Kids

It’s a blast from the past with '70s-style rock art that combines color, shape and texture. Cathie Filian and Steve Piacenza are full of crafty ideas guaranteed to rock your world! Planet Earth is the inspiration for amazing pebble paintings, stepping stones receive a personal touch, and paperweights and lucky bamboo bring a Zen presence to any desk.
Materials and Tools:
1/4" thick plywood (cut to desired size)
3/4" thick molding (enough to go around the plywood)
saw
miter box
wood putty
putty knife
wood embroidery hoops (different sizes to fit the design)
small aquarium pebbles (different colors)
natural pebbles
E6000 glue
large amount of Mod-Podge or other découpage medium
craft paint
paintbrushes
finishing nails and hammer
picture hanger
Steps:
1. Using a saw and miter box, cut mitered edges into the molding to create a frame for the plywood. Attach the molding to the outside edges of the plywood with finishing nails.
2. Fill any gaps between the plywood and the frame with wood putty. Next, apply a small amount of putty around the perimeter of the plywood where it meets the molding frame and let dry.
3. Paint the frame and plywood interior a color that will match the rocks. Based on the design pattern, paint each of the inside hoops with craft paint and let dry.
4. Place the hoops on the plywood according to the pattern and glue in place. If desired, cut the hoops apart, remove a section and place the hoops in an interlocking pattern with another hoop.
5. Fill the hoops with colored aquarium rocks. Fill the remainder of the plywood base with natural pebbles.
6. Pour découpage medium over the surface of the artwork. Brush the medium evenly over the frame to create a uniform sheen.
7. Let the découpage medium dry flat for 2 weeks. Attach a picture hanger to the back to hang or use flat as table decor. If hanging on the wall, use an anchor to support the weight.
Check out all the great projects
From DIY http://www.diynetwork.com/decorating/a-blast-of-rock-art/index.html
Sunday, February 6, 2011

Sunday, January 30, 2011
Eggs are fast Rolling
 This is a pretty mosaic egg found over at instructables.
Great they way it is !
Now combine this with the glue egg and I bet you would have a great egg display item.
Saturday, January 29, 2011
Bottle Cap Hot Plate Mat

A unique hot plate mat which looks like a bunch of grapes may be hung on the wall as a plaque when not in use on the table. Bottle caps are covered with crochet and sewed together, leaves and a loop stem are added, making a gift or bazaar item. Use string weight thread and size 7 or g crochet hook. Make grapes in purple, leaves and stem green.
In purple ch 6, join in first ch to form a ring.
Row 1: Ch 3, make 19 dc in ring.
Rnd 2: Rnd 2: Working in back lps of sts only ch 3, dc in same place, 2 dc in of next 19 dc, join with sl st in third ch of ch 3 first made.
Rnd 3: Ch 3, dc in each of the 39 dc around. Join with a sl st in third of ch 3 first made. Place this over a bottle cap and work next Row.
Rnd 4: Ch 3, * sk 2 dc, dc in next dc, repeat from * 12 times, join and fasten off.
This complete one. Make 12 more covers in the same manner. Arrange as shown in sketch and sew together.
Stem-Fasten green thread at top of middle bottle cap and ch 30. Sl st in same space. Fill ch lp with sc.
Leaf-In green ch 4, 3 sc in second st from hook, 5 dc in next st of ch, 3 sc in last st, ch 1 to turn all rows.
Row 2: 3 sc in first sc, sc in each of next 9 sc, 3 sc in last sc.
Row 3: Sc in each st.
Row 4: 2 sc in first sc, sc in each of next 13 sc, 2 sc in last sc.
Row 5: Sc in each st.
Row 6, 7: 2 sc in first sc, sc in each remaining sc.
Row 8: 2 sc in first sc, sc in each of next 16 sc, 2 sc in last sc.
Row 9: 2 sc in first sc, sc in each of next 17 sc, 2 sc in next sc.
Row 10: 3 sc in first sc, sc in each sc across, 2 sc in last sc.
Rows 11, 12: Repeat rnd 10.
Row 13: 3 sc in first sc, sc in each of next 21 sc.
Row 14: Sk 1 sc, sc in each of next 15 sc, 2 sc in next sc.
Row 15: 2 sc in first sc, sc in each of next 13 sc, 2 sc in next sc.
Row 16: 2 sc in first sc, sc in each sc across.
Next 3 rows: Dec 1 st in first and last sc, sc in each sc between.
Row 20: Sk first sc, dec in next 2 sts, sc in each of next 6 sc, dec in next 2 sts.
Row 21: Sk first sc, dec in next 2 sts, sc in each of next 3 sc, dec in next 2 sts.
Row 22: Work 1 Row even.
Row 23: * Dec in next 2 sts, repeat from * across.
Row 24: Dec in first 2 sts, fasten off.
Each side of leaf is shaped by the decreasing. This completes one.
Make 2 leaves.
Sew leaves to the bunch of grapes and stem as shown in the illustration.
Thursday, January 27, 2011


Sunday, January 23, 2011

Thursday, January 20, 2011
Monday, January 17, 2011
Way Past Christmas
Yes I know it is way past Christmas.
But I was ill over the holiday and still wanted to post.
These are my handmade.
Some of these are 40 years old and the patterns long gone, but still cute just the same. Most were gifts from my mother but my favorites are the walnut shells.
The Eskimo and Snow people are walnut with filbert heads.
The Dolls are clothespins and cork.
The beads are created around small mirrors.
The snowman is wooden dowels and buttons.
I see on etsy they are back with a modern twist.
Would love to see your handmade and post on the site with any patterns or tips and your name.


Friday, January 14, 2011
Crochet Hens and chicks

Materials Required—The following AMERICAN THREAD COMPANY Products:
15" HEN. "DAWN" KNITTING WORSTED. 1 ¼-oz. Skeins. 4 Skeins Red and 2 Skeins White. Bone Crochet Hook No. 5. (Worked single yarn.)
8" HEN. "DE LUXE" MERCERIZED CROCHET AND KNITTING COTTON. 1 400-yd. Ball White and 2 250-yd. Balls Red will make 2 hens. Steel Crochet Hook No 7. (Worked single thread.)
¾ yd. Ribbon for each Hen.
Cotton or Kapok for filling.
BABY CHICKS. "DAWN" KNITTING WORSTED. 1 ¼-oz. Skeins, White or Yellow. 1 Skein will make 2 chicks. 1 ¼ yds. Red for each bill. 1 Ball "Star" Pearl Cotton Size 5, Yellow will make feet for 6 chicks. Steel Crochet Hook No. 4.
2 Buttons for each Hen and Chick.
HEN. Right side—With Red, ch 23, insert needle in 3rd st from hook and pull loop through, skip 1 st of ch, insert needle in next st, and pull loop through, yarn over and pull through all 3 loops on needle, * ch 1, insert needle in same space with last st, pull loop through, skip 1 st of ch, insert needle in next st, pull loop through, yarn over, and pull through all 3 loops on needle, repeat from * to end of row, ch 3, turn (10 patterns). 2nd Row—Insert needle in 3rd st from hook and pull loop through, skip 1 st, insert needle in next st, pull loop through, yarn over and pull through all 3 loops on needle, * ch 1, insert needle in same space with last st, pull loop through, skip 1 st, insert needle in next st, pull loop through, yarn over and pull through all 3 loops on needle, repeat from * to end of row, ch 3, turn. Repeat 2nd row once. (Ch 2 to turn all decrease rows.) 4th Row—Decrease 1 pattern at the beginning of row, work in pattern even across remainder of row. (To decrease: skip 1 st, s c in next st.) Repeat the 4th row twice, then work 4 more rows even. 11th Row—Increase 1 pattern at the beginning of row. (Increase: insert needle in 3rd st from hook, pull loop through, insert needle in next st, pull loop through, yarn over and pull through all loops on needle, ch 1, insert needle in same space with last st, pull loop through, insert needle in next st, pull loop through, yarn over and pull through all loops on needle, ch 1.) Work even across remainder of row. Re¬peat the 11th row 12 times. 24th Row—Work even. 25th Row—Increase 1 pattern at the beginning of row. Repeat the last 2 rows twice, then work 4 rows even. 34th Row—Decrease 1 pattern at the beginning of row and work 1 row even. 36th Row—Start Head—Work 11 patterns, ch 3, turn, work 2 rows even. 39th and 40th Rows—Increase 1 pattern at the beginning of each row, then work 8 rows even. 49th to 53rd Rows—Decrease 1 pattern at the beginning of each row, break yarn. Attach yarn at back of neck and work in pattern to end of row, ch 3, turn. Start Tail—Work 7 patterns, ch 2, turn. Decrease 1 pattern at beginning of row, work 6 patterns, ch 2, turn. Decrease 1 pattern at be¬ginning of row and work 5 patterns, then work 1 row of s c all around section working 1 s c in each pattern and 1 s c in each row with 2 s c at feet corners and at tail tip, break yarn. Work another section in same manner.
UNDER SECTION. With White, ch 7, work 2 patterns on ch, ch 3, turn. 2nd Row—Increase 2 patterns, (4 patterns in row) ch 3, turn. 3rd to 10th Rows—Increase 1 pattern at the beginning of each row, then work 3 rows even. Next 2 rows—Decrease 1 pattern at the beginning of each row. 16th to 24th Rows—Work even. Next 6 Rows—Increase 1 pattern at the beginning of each row. 30th to 40th Rows—Work even. 41st to 50th Rows—Decrease 1 pattern at the beginning of each row, then work 2 rows even. 53rd to 57th Rows—Increase 1 pattern at the beginning of each row. Work 24 more rows even, then decrease 1 pattern at the beginning of each row until 1 pattern remains. Work 1 row of s c all around, 1 s c in each row, break yarn.
UNDER SECTION FOR LEG. With Red, work 2 sec¬tions following the first 11 rows of right side, then work 1 row of s c all around.
WINGS, COMB AND TAIL. With Red, ch 21 and work 20 s c on ch, ch 1, turn, working remainder in back loop of st only, 1 s c in each of the next 19 s c, ch 3, turn, 1 s c in first st of ch 3, 1 s c in each of the next 5 s c, * ch 1, turn, 1 s c in each of the next 4 s c, ch 3, turn, 1 s c in first st of ch 3, 1 s c in each of the next 4 s c, 1 s c in each of the next 2 s c on base, repeat from * 7 times, working the last 2 s c over the 2 rows of base, break yarn and work 7 more Red and 6 White sections in same manner.
BILL. With Red, ch 9 and work 8 s c on ch, ch 1 to turn each row. Work 5 more rows of s c even, then decrease 1 s c at the beginning of each row until 2 sts remain. Work 1 row of s c all around, break yarn. Work 1 more section in Red and 1 section in White.
TO ASSEMBLE HEN. Sew the under section for leg to lower edge of side section, starting at the 12th row. Sew other under section to other side in same manner. Sew tail together for about 14 rows starting at straight part of back at lower edge of neck. Sew under section in position starting at about the 26th row at tail and 1st row of under section working down to 12th row, then sew to under section of leg, up front and around head. Sew other side to correspond leaving enough opening for filling. Stuff with cotton or Kapok and sew remainder.
COMB. Sew 2 Red and 1 White section together and sew to top of head as illustrated.
TAIL. Sew 2 Red and 1 White section together and sew to tail as illustrated. Sew 2 White and 2 Red Sections on each side for wings as illustrated.
BILL. Sew 1 White and 2 Red sections together and sew to front of face as illustrated. Sew eyes in position.
BABY CHICKS
BODY. With White, over a 3 inch cardboard wind wool 100 times, slip from cardboard and tie through center, leaving about 5 inches of thread.
HEAD. Over a 2 inch cardboard wind wool 75 times, slip from cardboard and tie through center leaving about 5 inches of thread.
BILL. With Red, ch 8, 2 s c in second st from hook, 1 s c in each of the next 5 sts of ch, 2 s c in next st, working on opposite side of ch, 1 s c in each st of ch. Join and break yarn.
LEGS. With Yellow "Star" Pearl Cotton, using double thread, ch 6 join, ch 1 and without joining rows, working in the back loop of st only, work 1 s c in each s c, until work measures about 1 inch.
FEET. * Ch 4, turn, work 3 s c on ch, s c in same space with ch 4, s c in next s c, repeat from * twice, then ch 2, s c in second st from hook, s c in same space with ch 2, s c in next s c, break thread. Work another leg in same manner.
TO MAKE CHICKS. Trim pompons to shape body and head, tie head and body threads together. Sew eyes and legs in position. Fold Bill in half and sew in position. Comb Body and Head to fluff.
Wednesday, January 12, 2011
Crochet Horse Vintage Pattern

Materials Required—The following AMERICAN THREAD COMPANY Products:
9 ½" HORSE. (Top of head to feet) "STAR" PEARL COTTON, Size 5. 60 yd. Balls. 8 Balls White and 1 Ball Red. Steel Crochet Hooks No. 4 and 8. Work with two strands of thread.
13 ½" HORSE. "DAWN" KNITTING WORSTED, 1 ¼ oz. Skeins. 4 Skeins Brown and 1 Skein Tangerine or Orange. Bone Crochet Hooks No. 3 and 6. Work with single yarn.
Cotton or Kapok for filling.
17 ½" HORSE. "STAR" COTTON YARN, 100 yd. Skeins. 7 Skeins Black and 1 Skein White. Crochet Hooks No. 6 and G. Work with double yarn.
BODY. With White and Large Hook ch 38 and work 37 s c on ch. Ch 1 to turn each row. 2nd and 3rd Rows—2 s c in first s c, 1 s c in each remaining s c. 4th and 5th Rows—1 s c in each s c. 6th Row—Increase 1 s c at beginning of row and work 2 rows even. 9th and 10th Rows—Increase 1 s c at beginning of each row. 11th Row—Increase 1 s c at beginning of row and work 4 rows even. 16th, 17th and 18th Rows—Decrease 1 s c at beginning of each row. 19th Row—Start Neck—Work 1 s c in each of the first 17 s c, ch 1, turn. 20th Row—Decrease 1 s c at beginning of row, 1 s c in each remaining s c of neck. 21st Row—1 s c in each s c. Repeat the 20th and 21st rows 3 times. 28th Row—Decrease 1 s c at beginning of row, 1 s c in each remaining s c, ch 12 for head, turn. 29th Row—11 s c on ch, 1 s c in each s c of neck. Next 14 Rows—Decrease 1 s c at beginning of each row, break thread.
LOWER SECTION OF FACE. Attach thread at neck edge in the 28th row and in the first st of the ch 12 and work 1 s c in each of the next 10 sts of ch, 2 s c in last st, ch 1, turn and work 3 more rows even. 5th Row—Decrease 1 s c at beginning of row and work 1 row even. Next 4 Rows—Decrease 1 s c at beginning of each row, break thread. Attach thread in first s c of 18th row and work 1 s c in each of the next 14 s c, ch 1, turn. Decrease 1 s c and work 1 s c in each of the next 13 s c, ch 1, turn, decrease 1 s c and work 1 s c in each of the next 12 s c, then work 1 s c in each s c across back, 1 s c in each row of neck, 1 s c in each s c at top of head, continue working around head and down the front to the first row without breaking thread.
START FRONT LEG. 2 s c in first s c of opposite side of ch 38, 1 s c in each of next 8 sts, ch 1, turn. 2nd Row—Decrease 1 s c, 1 s c in each of the next 9 s c. 3rd Row—Increase 1 s c at beginning of row. 4th Row—Decrease 1 s c at beginning of row. Repeat the 3rd and 4th rows 3 times. 11th Row—1 s c in each s c. 12th Row—Decrease 1 s c at beginning of row. Repeat 11th and 12th rows 3 times, then work 6 more rows even, break thread.
HIND LEG. Attach thread in 13th st from end of row, work 1 s c in each of the next 12 sts, ch 1, turn, and work 2 rows even. 4th Row—Increase 1 s c at beginning of row, 1 s c in each remaining s c. 5th Row— Decrease 1 s c at beginning of row, 1 s c in each remaining s c. Repeat the 4th and 5th rows once and work 1 row even. Next 8 Rows—Decrease 1 s c at beginning of each row and work 10 more rows even, break thread. Attach thread at top of head at face, work 1 s c in each of the s c of top of head to back of neck, ch 1, turn. Work 1 s c in each s c across top of head, down front of face, around mouth and up to under neck, ch 1, turn. Work 1 more row of s c all around head then work about 5 s c down back of neck, break thread. Work another section in the same manner.
UNDER SECTION. Work 2 under sections following the first 5 rows of body. Then work front and hind leg on each section.
EARS. Ch 2, 1 s c in first st, ch 1 to turn. 2nd Row—2 s c in s c. 3rd Row—2 s c in first s c, 1 s c in next s c. Work 8 more rows increasing 1 s c at beginning of each row, then work 1 s c in each row down one side, 3 s c in the first st, 1 s c in each row up opposite side, break thread.
TAIL. Ch 6, join and work 1 s c in each st, without joining rows and working in back loop of st only work 1 s c in each s c for 14 rows.
FRINGE. * Draw up a loop on hook about 3 inches or length desired, hold loop on hook, s c in next s c, draw up another loop on hook, s c in same s c, draw up another loop on hook, s c in next s c, repeat from * twice. Work a few loops in same manner in about 3 or 4 rows for under part of tail, break thread. Cut loops.
MANE. Ch 51 and work 50 s c on ch, then work fringe same as tail fringe.
BLANKET. With 1 strand of Red and Small Hook ch 46 and work 45 s c on ch. 2nd Row—Ch 3, turn, * 2 d c in same space with ch 3, skip 3 s c, s c in next s c, ch 3, repeat from * across row. (Ch 3 to turn each row.) 3rd Row—2 d c in same space with ch 3, s c over the ch 3 of shell, * ch 3, 2 d c in same space, s c over the ch 3 of next shell, repeat from * across row. Attach White and work 1 row of White, 2 rows of Red, 1 row of White, 2 rows of Red, then work 1 row of shells all around blanket. Work a band of 2 shells to fit around horse.
TO ASSEMBLE HORSE. Lay the under sections on body sections matching legs. Sew around both legs and to body, then place both body sections together, leav-ing center of under section open for filling. Fill and sew together. Sew Tail, Ears and Blanket in position. Fold Mane in half, cut loops and sew in position. Embroider eyes or use buttons sewed into a small piece of white felt.
BRIDLE AND REINS are made to fit. Using a single strand of Red, make a ch long enough to fit around mouth, join and work a row of s c on ch. The Bit is a ch to fit from one side of band in mouth and attached to opposite side. Work a band around head, across front of head and reins made of 2 rows of s c, break thread.


Monday, January 10, 2011


Sunday, January 9, 2011

Thursday, January 6, 2011

Friday, December 31, 2010
How to silk screen
Learn How to make your own silk screen. For more Printmaking How-To Videos & Articles, visit WonderHowTo.
Crocheted Baby Hat

Easy Crocheted Baby Hat
Judith Prindle
This measures 6&1/2 inches long to the eylets and 11 & 1/2 inches wide without stretching before it is stitched together.
Hook Size G
Redheart Baby Soft Yarn or Bernat Softee Baby Yarn
Always working in the back loop of each stitch for ribbed effect.
You also will be working in the same stitch as your turning chain through out. You just "ignore" the chain when you come to it, working only in the actual half double crochet.
Chain 36
Row 1: Half double crochet in second chain from hook and next 29 chains, single crochet in next chain, half double crohcet in last 4 chains. (34 half double crochet and 1 single crochet stitches).
Chain 2 and turn.
Row 2: Half double crochet in same stitch as turning chain, half double in next 3 stitches, chain 1 and skip the single crochet, half double crochet in next 30 stitches. ( 34 half double crochet and 1 chain) .
Chain 2 and turn.
Row 3: Half double crochet in same stitch as turning chain 2 and in next 29 stitches, single crochet in hole made by chain 1 loop, half double crochet in next 4 stitches. (34 half double crochet and 1 single crochet.)
Chain 2 and turn.
Repeat rows 2 and 3 for a total of 34 rows, except on last row do a slip stitch in the single crochet. Sew up seam.
Make a chain of 50-55 stitches or cut a length of ribbon to thread through eyelet holes. Tie in a bow. This opening can allow for wires if needed while baby is in the hospital.
Easy Newborn Baby Booties To Match the Hat
Judith Prindle
Size G Hook
Redheart Baby Soft Yarn or Bernat Softee Baby Yarn.
Measures about 3 & 1/2 inches square before it is crocheted together.
Working in back loop through out.
Chain 21 stitches.
Row 1: Half double crochet in second chain from hook and each chain remaining. ( 20 half double crochet stitches) Chain 2 and turn.
Row 2: Half double crochet in same stitch as turning chain 2 and in each half double crochet remaining. (20 half double crochet) Chain 2 and turn. Just ignore the chain 2 when you come to it, same as the hat.
Repeat row 2 until you have a total of 20 rows.
Turn your piece and working across the end of the rows, single crochet in the end of each half double crochet row. (total of 20 single crochet stitches)
Round One of top:
Fold the bootie in half , turn, and single crochet the toe together across the top, for a total of seven single crochet.
Now working in the one side of the bootie, half double crochet in the next 13 stitches continue around the other side of the bootie half double crochet in next 13 stitches on the other side. The back of the bootie will be open. Join by slip stitching around the beginning chain 2.
Round Two of Top:
Half double crochet around front of next half double crochet,
half double crochet around back of next half double crochet,
repeat this pattern to end of round, slip stitch around beginning
chain 2.
Round Three of top: Repeat round two. End off. Sew up the heel seam.
Either crochet a length of yarn to fit around bootie or use a ribbon. Thread this through the first round of the bootie top and tie.
Wednesday, December 22, 2010

Tuesday, December 14, 2010

Sunday, December 12, 2010
Cards made from Scraps


I save every scrap of paper to make cards at the end of the year.
I could buy cards but these seem so much more fun and frugal.
Thursday, November 18, 2010
Snowman Soup
Snowman Soup Craft
1 package hot chocolate mix
3 Hershey Kisses
10 mini-marshmallows
1 candy cane
Place ingredients in a ziplock bag, mug, or jar and attatch a label.
You can print it onto a avery sticker sheet, or punch a hole in the
corner and tie it on with some pretty ribbon. The possibilites are endless! :)
-------------------------------------------------
Warm the hearts of good little boys and girls with a packet of Snowman Soup!
Easy enough for children to make, Snowman Soup is perfect for stocking stuffers, office gifts, Secret Santa presents or 12 Days of Christmas gifts.
Snowman Soup Recipe:
Printable Snowman Soup Bag Topper Assemble in a gift bag, gift mug or small zipper food storage bag:
•1 individual packet hot chocolate mix
•2-3 chocolate kiss candies
•10-15 mini-marshmallows
•small candy cane
Attach free printable Snowman Soup Gift Tag or Snowman Soup Bag Topper and share a warming gift!

Or, hand-write this poem and attach to gift:
Snowman Soup
Was told you've been real good this year.
Always glad to hear it!
With freezing weather drawing near,
You'll need to warm the spirit.
--------------------------------------------------
Snowman Soup
"Was told you've been real good this year.
Always glad to hear it! With freezing weather drawing near,
you'll need to warm the spirit. So, here's a little Snowman Soup,
complete with stirring stick. Add hot water and sip it slow, it's sure to do the trick"
Add a message on the back of the card for directions:
Mix 3 heaping tablespoons with hot water and enjoy !
If you use enough for 2 then add a message noting there is enough for 2 mugs of soup to enjoy or share with a friend.
This was an easy and inexpensive treat for craft shows, small gifts, etc. Hope you enjoy !!
------------------------------------------------------------------------------
Snowman Soup for Gifts
Snowman Soup Recipe I
I have seen several varieties of Snowman soup on the internet.
I buy my mugs at the dollar store ($1 each). Wash them well.
I got approximately. 12 gifts out of this recipe.
4 cups powdered coffee creamer
1 cup cocoa
3 cups powdered sugar
12 oz milk chocolate chips
6 oz semisweet chocolate chips
2 Tbsp.. vanilla powder (optional)
Miniature marshmallows
Candy canes (wrapped) or cinnamon sticks.
Mix all ingredients well. Place 3 heaping tablespoons per
serving in a small plastic bag (I used enough for 2 servings)
and close with a twist tie. Place candy cane or cinnamon stick in mug.
Place plastic bag in bottom of mug then place a paper cupcake liner on top of bag.
Fill with approx. 15 mini marshmallows. Place filled mug into a small plastic
bag or wrap with plastic wrap and tie at top (I found a mug fits well into a Glad
sandwich bag if you line the handle up with the corner side).
Decorate with curly ribbon, etc. Attach following on a card:
Snowman Soup
"Was told you've been real good this year.
Always glad to hear it! With freezing weather drawing near,
you'll need to warm the spirit. So, here's a little Snowman Soup,
complete with stirring stick. Add hot water and sip it slow, it's sure to do the trick"
Add a message on the back of the card for directions:
Mix 3 heaping tablespoons with hot water and enjoy !
If you use enough for 2 then add a message noting there
is enough for 2 mugs of soup to enjoy or share with a friend.
This was an easy and inexpensive treat for craft shows, small gifts, etc. Hope you enjoy !!
By Hvnlyhills from Peebles, OH
--------------------------------------------------------------------------------
Snowman Soup II
This comes from somewhere, it was sent to me. If its yours, let me know and I'll put your name in here!
1 package Hot Chocolate Mix
3 Hershey Kisses or Hugs
10 miniature marshmallows
1 Peppermint Candy Cane
Place all of the above into a new mug, then cover or wrap with cellophane, decorate and attach the following poem...
"Was told you've been real good this year, Always glad to hear it
With freezing weather drawing near
You'll need to warm the Spirit
So here's a little Snowman Soup
Complete with a stirring stick
Add hot water, sip it slow
It's sure to do the trick!"
-----------------------------------------------------------------------
Video
http://www.youtube.com/watch?v=ygxvN3nex2M
-------------------------------------------------------------
How to Make Fuzzy Dice Link
Found
Great instruction site with photos for fuzzy dice.
For the car guys and collectors there a fun easy Holiday gift.

Check out the tutorial HERE
Wednesday, November 10, 2010

Friday, November 5, 2010

Thursday, November 4, 2010
Ten Cake Recipe
Ten Wedding Cake
Looks like a pound cake but tastes much better.
Ingredients:
1 cup butter or margarine
1/2 cup solid Crisco
4 cups cake flour
3 cups sugar
1 cup milk
6 eggs
1 tsp. favorite flavoring
Directions:
Cream shortening and sugar. Add eggs one at a time. Add flour and milk alternately, then the flavoring. Pour into a greased and floured tube cake pan. Bake at 350 degrees F for one hour and 15 minutes or until done. Enjoy. If you use plain flour instead of cake flour take out one tablespoon of flour per cup used for the same results
Recipe card

Meatloaf Parmesan Recipe
Ingredients:
2 lbs. lean hamburger
2 eggs
1 medium onion
3 Tbsp. teriyaki sauce
4 Tbsp. milk
2 Tbsp. Italian seasoning
1 cup bread crumbs
1 cup spaghetti sauce
1 cup shredded mozzarella cheese
1/2 cup Parmesan cheese
1 Tbsp. parsley
Directions:
Beat the eggs and mix with hamburger. Add teriyaki sauce and milk, mix well. Grate the onion into the mixture with a cheese grater and blend well. Add bread crumbs and mix. It should just hold together, add more crumbs if needed. Put in a brownie size pan. Top with sauce, spreading to cover. Bake at 350 degrees F for 1/2 hour.
Mix the 2 cheeses together. Remove pan from oven, sprinkle cheese over top covering meatloaf. If you like dishes really cheesy you can add more mozzerella. Sprinkle parsley on top.
Return to oven for 10 minutes or until cheese just starts to turn brown.
Serve with your favorite pasta dish.
Servings: 6
Time: 15 Minutes Preparation Time
40 Minutes Cooking Time

Wednesday, October 27, 2010
Fabric Flower brooch
Looky looky I found another flower tutorial.
Wow what a beauty
I see she used a button for the center and think this would be great with an old rhinestone earring or small rhinestone pin as the center.

Monday, October 25, 2010
Winter in The Garden
Winter in the gardenCold Season Vegetables
Generally, cold season vegetables will survive sudden summer frosts, snows and cold.
Long-considered a delicacy in Europe, asparagus cultivation is becoming evermore popular. A "must" for edible landscapes. Scatter single plants throughout your garden, or place selectively for backdrops or borders. Provides delicate, lacy, summer foliage and fine, tender, tasty spears.
FROST TOLERANCE: Good.
CULTURE: Takes up to 10 weeks to germinate in cold soil. Plant in flats 8-10 weeks early, or when soil reaches 60· F. Transplant small plants into shallow trenches rich in compost. Hill as they grow. If using root crowns, fill bottom of 6" trench with compost; spread roots; bury 4". Compost heavily each year.
HARVEST and STORAGE: Carefully cut young shoots early spring, third year. Do not disturb root crowns. Store 2-3 weeks at 32-36· F., in humid environment.
INSECTS and DISEASES: Control asparagus beetles with pyrethrum. Asparagus rust (appears as reddish or black blisters on stems and foliage) is associated with very damp conditions. Remove all above-ground plant material to avoid disease. Diseased tops should be cut and burned.
REPRODUCTION: Asparagus produces both male and female plants. Late summer, female plants produce red berries that can be dried and saved as seed, or allowed to fall on ground to reseed. Propagate male plants by dividing root crowns in early spring or late fall. Male plants yield larger number of shoots for eating.
SPACING: rows 48"; plants in rows 9-15"; plants in beds 12"
SOIL PH: 6.0-7.5 SEEDS PER GRAM: 24 PER OUNCE: 1200
FAVA BEAN (A) Vicia faba
We first discovered the delicious fava bean high in the mountains of Guatemala. No mountain garden should be without these frost-hardy jewels. Expect large, meaty, brown beans to eat fresh like tender, green lima beans, or store for hearty, mid-winter meals.
FROST TOLERANCE: Good.
CULTURE: Plant seeds in early spring as soon as ground can be worked. Companion plants include: potatoes, cucumbers, corn. Dislikes: onions and garlic.
INSECTS AND DISEASES: Control beetles with rotenone or pyrethrum. Blights, mosaic and mold can be minimized by watering deeply at base, keeping tops dry. Rotate in at least 3-year cycles.
HARVEST AND STORAGE: Harvest for use as fresh beans, or allow to dry for winter storage. Store fresh 2 weeks at 35-40· F., in humid environment. Keep dry beans in cool, dry, place with air circulation.
SEED PRODUCTION: Fava or broad beans, unlike green beans, have showy flowers, often pollinated by bees. Separate different varieties 100 feet if some crossing is tolerable, 1000 yards if purity is desired.
SPACING: rows: 24"; plants in rows: 8"; plants in beds: 8"
SOIL PH: 6.5-7.5 SEEDS PER OUNCE: 20-25 POUND: 275-400
BEET (B) Beta vulgaris
FROST TOLERANCE: Tolerates moderate frosts. Expect slow growth until temperatures rise.
CULTURE: Cold-tolerant crop after germination. Avoid planting until soil reaches 60· F. Transplanting not recommended. Beets prefer deep, rich, well-composted soil, but tolerate average soil, if provided enough trace minerals and sun. For larger, more uniform roots, thin to 1 plant every 4". Companion plants include: onions.
HARVEST AND STORAGE: For steady supply of fresh, young greens, plant every 2-3 weeks. Store beets with greens still attached up to several weeks in cold, humid environment. Roots will last for several months in cold, dry sand or sawdust.
DISEASES: To minimize scab, provide rich, well-composted soil.
SEED PRODUCTION: Flowers contain both male and female parts, but do not self-pollinate before flowers open. As pollen is carried long distances by wind, grow seeds for only one variety at a time. Note: beets will cross with Swiss chard. Since beets are biennials, pull first-year roots before ground freezes. Store at 40· F., and replant best roots early next spring (18" spacing).
SPACING: rows 12-24"; plants in rows 4"; plants in beds 3-4"
SOIL PH: 6.5-7.5 SEEDS PER GRAM: 55 OUNCE: 2100
BROCCOLI (B) Brassica oleracea, var. botrytis
A wonderful vegetable that actually grows better in cooler climes and higher altitudes than in warmer lowlands!
FROST TOLERANCE: Mature plants survive temperatures as low as 10· F. Protect very young plants from frost.
CULTURE: Plant seeds in flats 4-7 weeks early, or after soil reaches 45· F. Demands soil high in nitrogen and phosphorus. To reach full size, space heading varieties at least 18". Water frequently and consistently throughout growing season, increasing amount of water when flowers appear. Stagger plantings of hybrid, heading varieties. Companion plants include: dill, chamomile, sage, peppermint, beets, onions. Dislikes: tomatoes.
INSECTS AND DISEASES: Cabbage worms can be controlled by Bacillus thuringiensis, if applied early and frequently. If root maggots become problem in extremely wet weather, carefully mix diatomaceous earth or wood ashes into soil, or protect soil from rain. Tar paper placed around base of plants deters flies that lay eggs which hatch into root maggots. Control aphids with pyrethrum. Disease is rare in higher and drier climes. Keep soil healthy. Rotate in at least 3-year cycles.
HARVEST AND STORAGE: Harvest flower buds before they begin to open. To encourage continued production, harvest regularly when side shoots appear. Harvest hybrid, heading varieties (10-14 day field life) early. DeCicco and other sprouting varieties, left in ground until cooler fall days, come into an especially productive second season. Store fresh up to 2 weeks at near-freezing temperatures.
SEED PRODUCTION: Although broccoli flowers contain both female and male flowers, individual plants do not self-fertilize. Provide at least two or more flowering plants to assure seed formation. Since bees can cross-pollinate broccoli with other brassicas (cabbage, cauliflower, kale and brussels sprouts), if purity is desired, isolation distances should be 1000 yards or more.
SPACING: rows 24"; plants in rows 12-24"; plants in beds 18"
SOIL PH: 6.5-7.5 SEEDS PER GRAM: 315
BRUSSELS SPROUT (B) Brassica oleracea var. gemnifera
Perfect for the mountain garden! Brussels sprouts become tastier after temperatures fall below freezing.
FROST TOLERANCE: Mature plants survive temperatures as low as 10· F. Protect very young plants from frost.
CULTURE: See Broccoli.
INSECTS AND DISEASES: See Broccoli.
HARVEST AND STORAGE: Harvest bottom sprouts first. Leave some for winter when they will taste extra mild and buttery. (Remember to mark plants so they can be found in deep snow.) Store up to 4 weeks in near-freezing, humid environment.
SEED PRODUCTION: See Broccoli.
SPACING: rows 30"; plants in rows 18"; plants in beds 18"
SOIL PH: 6.0-6.7 SEEDS PER GRAM: 300
CABBAGE (B) Brassica oleracea var. capitata
FROST TOLERANCE: Protect young plants from frost, especially after transplanting. Mature plants can withstand temperatures as low as 10· F.
CULTURE: Plant seeds in flats 4-7 weeks early, or after soil reaches 50· F. Provide enough light to avoid long, thin stems that will restrict later growth. (Twenty watts of artificial light per-square foot is sufficient.) Cabbage is less demanding than either cauliflower or broccoli, but still benefits from nitrogen-rich, nutritious soil. Water heavily when heads begin to form. Stagger plantings of same variety every 2 weeks.
INSECTS AND DISEASES: Avoid top watering. Rotate in at least 3-year cycles. See Broccoli.
HARVEST AND STORAGE: We have had some success storing cabbage fresh in the garden by twisting the head until stem cracks. This procedure arrests further growth, but cabbage remains alive and fresh. Once harvested, store trimmed heads for months in near-freezing, humid environment. As field life of hybrids is limited, harvest hybrids as soon as ready.
SEED PRODUCTION: See Broccoli. Heads brought in for winter can be replanted early following spring. Allow bottom of head to rest on top of soil. 1" deep cuts across top of head will facilitate emergence of second-year growth.
SPACING: rows 30"; plants in rows 18"; plants in beds 15-18"
SOIL PH: 6.5-7.5 SEEDS PER GRAM: 300
CARROT (B) Daucus carota
FROST TOLERANCE: Excellent
CULTURE: Because of tap root, it is advisable to avoid starting carrots in flats for transplanting. Plant seeds after soil reaches 55· F. Carrots do best in rich (high in phosphorus and potassium with only moderate levels of nitrogen), uncompacted soil. Plant into firm, even seedbed. Weed continuously. (Because carrot seed usually takes 10 days to germinate, fast germinating weeds in a large bed can be controlled by burning with a torch without harming carrots.) Hill with dirt to avoid green shoulders and to protect from fall frosts. Companion plants include: peas, leaf lettuce, onions, garlic, tomatoes, sage. Dislikes: dill.
DISEASES: Provide fertile soil and rotate in least 3-year cycles to avoid most problems. In the mountains above 5,000 feet, we've never had fungus, blight or insects.
HARVEST AND STORAGE: For best taste and highest quality, harvest within 2 weeks of reaching maturity. Although carrots can be left in the garden protected by heavy mulch and deep snow, we prefer harvesting before ground freezes, and storing for winter in cold, dry sawdust or sand.
SEED PRODUCTION: Carrots are biennial with perfect flowers (each flower has both male and female parts). As insects are major pollinating agent, separate different varieties at least 100 yards if some crossing is tolerable, 1000 yards for purity. Beware that carrots will cross with Queen Anne's Lace (wild carrot)! Store best roots for replanting following year. Since flowering tops are quite large, leave minimum 2' between each carrot.
SPACING: rows 18-24"; plants in rows 1-3"; plants in beds 2"
SOIL PH: 5.5-6.7 SEEDS PER GRAM: 600 OUNCE: 9600
CAULIFLOWER (B) Brassica oleracea var. botrytis
FROST TOLERANCE: Mature plants survive temperatures as low as 10· F. Protect very young plants from frost.
CULTURE: The key to growing beautiful cauliflowers is consistency. Protect young plants from frosts. Water frequently. Side-dress with fertilizer or compost. Best results are obtained when plants are given at least 24" spacing. See Cabbage.
INSECTS AND DISEASES: See Broccoli.
HARVEST AND STORAGE: When white heads begin to appear, tie outer leaves together over top to preserve color and texture. See Broccoli.
SEED PRODUCTION: See Broccoli.
SPACING: rows 24"; plants in rows 12-24"; plants in beds 15"
SOIL PH: 6.5-7.5 SEEDS PER GRAM: 315
KALE (B) Brassica oleracea var. acephala
In harsh, high altitude gardens, one of the most dependable sources for vitamins and minerals. Frost improves rich flavor. Mark in fall to facilitate harvesting fresh and green in waist-deep snow.
FROST TOLERANCE: Very good.
CULTURE: Plant in flats 4-6 weeks early, or as soon as ground can be worked in spring. Fall crop can be planted 2-3 months before growing season ends. See Cabbage for companion plants.
INSECTS: Cabbage worms are rarely a problem but can be controlled with Bacillus thuringiensis.
HARVEST AND STORAGE: Pick outside leaves first to stimulate continued production. Store 2 weeks at near-freezing temperatures, in humid environment.
SEED PRODUCTION: See Brussels Sprouts.
SPACING: rows 24-36"; plants in rows 18-24"; plants in beds: 16"
SOIL PH: 6.0-7.0 SEEDS PER GRAM: 300
LETTUCE (A) Latuca sativa
FROST TOLERANCE: Good to around 20· F., if hardened properly.
CULTURE: Plant seeds in flats 3-4 weeks early, or as soon as ground can be worked. Harden before transplanting by lowering temperature. Provide nitrogen-rich soil. (Add extra compost or chicken manure, if needed.) Water heavily in hot weather, but make sure leaves dry out before dark. Water head lettuce at base and keep in shade to avoid rot. Stagger plantings every 10 days, planting smaller amounts more often as weather becomes hot. For full heads, thin to 8". Companion plants include: carrots, radishes.
HARVEST AND STORAGE: Harvest young and tender. As long as weather is cool, outside leaves on looseleaf varieties can be continually picked as they mature. Store 1-2 weeks in refrigerator with stems submerged in bowl of water.
SEED PRODUCTION: Lettuce produces perfect yellow flowers on tall, bushy seed stalks. Since flowers self-pollinate, there is little chance of cross-pollination between varieties. For purity, separate at least 25 yards with other crops.
SPACING: rows 12-24"; plants in rows or beds 8-12"
SOIL PH: 6.5-7.5 SEEDS PER GRAM: 800 OUNCE: 23,750
BUNCHING ONION (B) Allium cepa L.
FROST TOLERANCE: Good.
CULTURE: Plant seeds in spring as soon as ground can be worked. Prefers well-drained, rich soil, high in organic matter. Water frequently, especially during dry spells. Companion plants include: beets, lettuce, tomatoes, strawberries, chamomile. Dislikes: peas, beans.
DISEASES: To avoid most problems, rotate crops and eliminate standing water.
HARVEST AND STORAGE: Leave a few bunching onions in garden to self-divide and reproduce perennially. Store fresh in refrigerator or in cool, not too humid environment.
SEED PRODUCTION: See Leeks. Bunching onions can be left in ground through winter. Bulb onions are best stored inside. In early spring, replant largest bulbs 4" apart, covering firmly with 1/2" soil. If onions are blooming at same time as wild onions, cage domestic plants to prevent cross-pollination by bees.
SPACING: rows 18-24"; plants in rows 2-4"; plants in beds 1-3"
SOIL PH: 6.5-7.5 SEEDS PER GRAM: 325 OUNCE: 12,500
PEA (A) Pisum sativum L.
FROST TOLERANCE: Good.
CULTURE: Plant seeds as soon as soil reaches 40· F. Provide slightly limed soil that has plenty of phosphorus and potassium. To increase nitrogen fixation, which in turn will increase yields, inoculate seed or soil with rhizobium bacteria. In high altitude gardens, speed germination and prevent seed rot by starting peas in cold frames or poly tubes. Companion plants include: beans, corn, carrots, turnips, radishes. Dislikes: onions, garlic.
DISEASES: Prevent pea root rot by planting in well-drained soils and rotating crops frequently. If mildew or wilt are problems, use resistant varieties.
HARVEST: To assure steady supply, plant at 2 week intervals throughout season. Stimulate continuous production by harvesting mature peas.
SEED PRODUCTION: Peas produce self-pollinating flowers. Cross-pollination by insects is rare as pollination is complete before flower opens. To assure purity, separate different varieties with another (PEA (PEA continued) flowering crop. Maturity is complete when seeds rattle in dry pods (about 30 days after eating stage).
SPACING: rows 24-36"; plants in rows 3"; plants in beds 3-4"
SOIL PH: Above 6.5 SEEDS PER OUNCE: 80 POUND: 2000
RADISH (A) Raphanus sativus L.
This vegetable is one of the easiest to grow.
FROST TOLERANCE: Very good.
CULTURE: Plant seeds when soil temp. reaches 40· F. Radishes love cool weather. Plant early and often. Provide shade in summer. Plant with crops that take longer to mature (e.g. carrots or broccoli) and harvest first. Companion plants include: cucumbers, peas, cabbage, lettuce, nasturtiums. Dislikes: hyssop.
INSECTS AND DISEASES: Control flea beetles in their pursuit of radish greens with pyrethrum. Allow radishes to attract cabbage root maggots away from cabbage family crops. Use of wood ashes and diatomaceous earth will irritate and discourage small worms. Use resistant varieties to avoid Fusarium wilt. Avoid infected soil.
HARVEST AND STORAGE: For best results, harvest when young. Store 1-2 weeks in sealed container in refrigerator. Store Daikon varieties for winter in cold sand or sawdust.
SEED PRODUCTION: Radish is an annual, primarily pollinated by bees. Select best roots and replant 12-18" apart early same summer. For purity, separate different varieties 1000 yards. As daikon radish is a biennial, replant roots following spring. Allow most of seed pods to turn brown before pulling plant.
SPACING: rows 8-16"; plants in rows 1-3"; plants in beds 2-3"
SOIL PH: 6.0-7.0 SEEDS PER GRAM: 75 OUNCE: 2500
SPINACH (A) Spinacia oleracea L.
FROST TOLERANCE: Very good.
CULTURE: Plant seeds in flats 3-4 weeks early, or as soon as ground can be worked. Provide moist, fertile soil. Water frequently, especially during dry spells. Occasionally feed with manure tea. To assure a season-long supply, plant every 2 weeks. In hot, summer weather, plant bolt-resistant varieties.
INSECTS: Control aphids with pyrethrum.
HARVEST AND STORAGE: For continued production, carefully harvest mature, outside leaves. Store 2 weeks in refrigerator with stems submerged in bowl of water.
SEED PRODUCTION: Spinach is a dioecious annual, producing male and female plants. To improve quality of strain, remove plants that bolt first (they are usually males). Because spinach pollen is extremely fine, hard to contain in cages and easily carried long distances by the wind, plant a single variety of spinach for seed per year.
SPACING: rows 12-24"; plants in rows 2-6"; plants in beds 4"
SOIL PH: 6.5-7.5 SEEDS PER GRAM: 100 OUNCE: 2500
SWISS CHARD (B) Beta vulgaris var. Cicla
FROST TOLERANCE: Fair. Chard will withstand fall frosts to 15-20· F. If left to winter, protect with mulch.
CULTURE: Plant seeds as soon as soil reaches 50· F. See Beets. Companion plants include: onions. Dislikes: pole beans.
HARVEST AND STORAGE: To stimulate continued production, harvest mature, outer leaves first. See Spinach.
SEED PRODUCTION: See Beets. Swiss chard is classified in same species as beets, and will cross-pollinate. Be very careful if trying to produce seed for both at same time.
SPACING: rows 24"; plants in rows 8-12"; plants in beds 10-12"
SOIL PH: 6.5-7.5 SEEDS PER GRAM: 60
TURNIP (B) Brassica rapa L.
FROST TOLERANCE: Good.
CULTURE: Plant directly when soil reaches 50· F. Turnips grow in wide variety of soils but produce best in rich, loam. Water sufficiently, not allowing soil to dry out. Companion plants include: peas.
INSECTS: Control flea beetles with pyrethrum and rotenone. Use wood ash or diatomaceous earth to discourage root maggots.
HARVEST AND STORAGE: Begin harvesting greens and small turnips within 4 weeks. See Carrots.
SEED PRODUCTION: Turnips are biennials with perfect flowers. Store best roots to replant (12" spacing) next spring. Since turnips are pollinated by bees, and cross with numerous domestic and wild plants, including mustard, Chinese cabbage and horseradish, caging is recommended.
SPACING: rows 12-24"; plants in rows 2-5"; plants in beds 3"
SOIL PH: 6.0-7.0 SEEDS PER GRAM: 500
Tuesday, October 19, 2010
German Apple cake Recipe
Has anyone seen this Show called Mad Hungry.
http://www.madhungry.com/
Wonderful simple recipes and the host is fun to watch.
She enjoys cooking and her love of food comes into the show.
This is the first time I have seen the show and think for a young cook she is easy to follow and learn from.
Her recipe for apple cake looks really good.
German Apple Cake
Ingredients
Makes 1 8-inch square cake
1 cup all-purpose flour
1 1/2 teaspoons baking powder
1 teaspoon coarse salt
8 tablespoons (1 stick) unsalted butter, softened
1 1/3 cups sugar
2 large eggs, lightly beaten
1 teaspoon pure vanilla extract
1 teaspoon ground cinnamon
Juice of 1/2 lemon
3 to 4 tart apples, such as Granny Smith, Cortland, or Winesap
Directions
1.Preheat the oven to 375 degrees Fahrenheit. Butter an 8-inch square pan or equivalent-size baking dish.
2.In a small bowl, whisk together the flour, baking powder, and salt. In a medium bowl, cream together the butter and 1 cup of the sugar. Stir in the eggs and vanilla. Add the flour mixture and beat until combined. Spread the mixture evenly in the prepared pan.
3.In a small bowl, combine the remaining 1/3-cup sugar with the cinnamon. Squeeze lemon juice into a medium bowl. Peel, core, and slice the apples into the bowl. Add the cinnamon-sugar mixture and toss to thoroughly coat each apple slice. Arrange the apple slices on top of the batter in overlapping rows, pressing lightly into the batter. Bake for 45 minutes, until a cake tester or toothpick inserted in the center comes out clean. Cool in the pan on a wire rack for 10 to 15 minutes before serving.
From Mad Hungry, October 2010 .
Monday, October 18, 2010


Thursday, October 7, 2010
Paper Pumpkin
Paper Pumpkin
This fun paper mache pumpkin is not difficult to make but does require adult help.
Materials
Paper Mache Paste
Balloons (any size)
Newspaper
String
Paint
Construction paper
Googly eyes (optional)
General Instructions
Make Paper Mache Paste.
Paper Mache Paste
1 cup water
1/4 cup flour
5 cups lightly boiling water
Mix flour into one cup water until mixture is thin and runny, stir into boiling water. Gently boil and stir for 3 minutes. Cool before using. (Use with newspaper/newsprint strips for Paper mache).
Cut newspaper or newsprint into 2" wide strips.
Blow up balloons (as many as you like) and tie off. Attach string to tied end of balloon.
Once paper mache paste is cool, dip individual strips of newsprint into paste.
Apply strips to balloon one at a time. Repeat process until balloon is completely covered. The more layers the firmer your finished work will be.
Hang balloon by string in warm, dry area for at least 24 hours or until completely dry. Be sure to us a drip cloth to protect area.
**if you are making pumpkins - take a 1-2" piece of a paper towel or toilet paper roll. Hold on top of balloon and attach with newspaper strips to form stalk for pumpkin.
Paper Pumpkin
Once paper mached balloon is dry:
Gently insert sharp needle into base of balloon - you should hear a pop and balloon pull away from sides of hardened shell.
Gently push in bottom of shell to form a dent - or base for the pumpkin to sit.
Do not force. If dent will not form, use a cardboard strip, about 1" wide, stapled into a circle as a base.
Paint body of pumpkin orange. Paint stalk green.
To decorate paint eyes, nose and mouth on pumpkin in desired "look". You can use googly eyes if you wish. You can cut out green leaves from construction paper and use green floral wire to form vines.
You can also cut out eyes, nose and mouth using a sharp bladed knife. Then cut a circle in the back and shine a flashlight inside. Do NOT use a candle or flame. These pumpkins are paper and will immediately burn.
From visitors to Kids' Turn Central: "My kids and I made the paper mache jack o'lantern a few years back, but what we did with it was cut the top
Wednesday, October 6, 2010
Eastlake bench Almost Done
As most of you know I love to buy junk and turn it something fun.
We found an old eastlake antique bed and gave it a new life as a decons bench in the hallway.
I still need to stain and oil it but here's the finished design.


We found an old eastlake antique bed and gave it a new life as a decons bench in the hallway.
I still need to stain and oil it but here's the finished design.


Saturday, September 25, 2010

Thursday, September 23, 2010
Prim Sunflowers Tutorial
This is a wonderful tutorial on making prim sunflowers.
The site has a bunch of other things on it but scroll down to the bottom and check out this tutorial on Prim sunflowers .Found HERE

The site has a bunch of other things on it but scroll down to the bottom and check out this tutorial on Prim sunflowers .Found HERE

Subscribe to:
Posts (Atom)