Tuesday, March 2, 2010

Cake in 5 Minutes Crazy

The internet has had this crazy 5 minute cake running around for years but I actually tried it and it's not bad.
So here's the recipe and the instructions.
Would make a nice gift in a bag . Cute coffee
 cup and a nice sewn hand tied cloth bag.
 Big Ribbon and a sweet card with instructions. Wal-La Quick Gift

5 MINUTE CHOCOLATE MUG CAKE

4 tablespoons flour
4 tablespoons sugar
2 tablespoons cocoa
1 egg
3 tablespoons milk
3 tablespoons oil
3 tablespoons chocolate chips (optional)
A small splash of vanilla extract
1 large coffee mug (MicroSafe)
spray mug with non stick spray like Pam


Add dry ingredients to mug, and mix well. Add the egg and mix thoroughly.
Pour in the milk and oil and mix well..
Add the chocolate chips (if using) and vanilla extract, and mix again.
Put your mug in the microwave and cook for 3 minutes at 1000 watts.
The cake will rise over the top of the mug, but don't be alarmed!
Allow to cool a little, and tip out onto a plate if desired.
EAT ! (this can serve 2 if you want to feel slightly more virtuous).
And why is this the most dangerous cake recipe in the world?
Because now we are all only 5 minutes away from chocolate cake
at any time of the day or night!


Monday, March 1, 2010

Quick Color a Baby Quilt


By Ann from Loup City, NE

Approximate Time: 2 days
Supplies:
computer or tracing paper
1 yard of 36 inch muslin
four 2x42 inch strips fabric for sashing
four 4x42 inch strips for borders
nine 8 1/2x11 inch rectangles of wax paper
crayons
iron
Instructions:
There are two ways to make crayon colored blocks, either by printing out the pictures on fabric run through your printer then coloring them or tracing pictures to fabric over tracing paper or on a light source then coloring them. If you haven't tried printing on fabric, now is the time to try it, a very simple process and anyone can do it.
Here is a great site to get free pictures to download.
http://www.preschoolcoloringbook.com/
After choosing your pictures on the computer or scanning some in from coloring books, get your fabric/paper ready. I much prefer the computer method as it is so easy and quick.

What you will need to do is end up with a piece of muslin bonded with freezer paper the exact size of the copy paper 8.5x11 inches. For me, the easiest way to do this is to lay my muslin over my ironing board then lay the wax side of a large piece of freezer paper down on top matching the edges as close as you can.
I try to tear the paper large enough for the whole project. Then using a hot iron, press the two melting the wax and bonding the two together.
If you get bumps, just lift the paper and press again. Then take your bonded muslin and paper to a flat surface with the wax paper on top.
Lay a piece of 8.5x11 inch copy paper on top. Using a ruler, either draw around the copy paper and cut out through the bonded fabric and freezer paper or use your self healing mat, ruler and cutting wheel and cut out 9 blocks. Make sure you don't have any lose strings as they will catch in the printer.
Using your inkjet printer, put the fabric side down one sheet at a time. Choose your picture and tell it to print, it is that simple. Don't be discouraged if one has stray ink smudges on it, mine do that once in a while, set that one aside and print another.
Keep your two layers bonded until after they are colored as it makes the coloring much smoother and easier to color.
Once you have them all colored, peel the wax paper off and place it on top of the colored picture wax side down. Melt the wax paper into the picture while melting the colors into the fabric.
Now you are ready to cut your pictures to the size of block you need. Finish your quilt as you want but I just put a colorful sashing around the blocks and a border around the outside. For nine 8.5x8.5 inch blocks, you will need four 2 inch by 42 inch strips for the sashing and four 4 inch by 42 inch strips for the outside borders.
Assemble your quilt top and finish as you like. I generally tie baby quilts as they are washed so much and don't always get the best of care. If you would like help with the assembly process, feel free to contact me. I have taught quilting for many years and would be glad to help. I also have many quilt books and patterns that I would be glad to share.
By Ann from Loup City, NE

Sunday, February 28, 2010

Glass Garden Totem Lights

I have the pattern figured out but have not glued or staked.
What I really would like is to figure out how to put lights inside where I can change the light bulb.
I will post again when finished.
How to make
step 1
Collecting your glass pieces
Look for pieces that will stack well together and have a flat gluing surface on the bottoms.
This will help prevent water and air from getting inside once they are glued together and
it will help the totems look level when you have a flat gluing surface to work with.

step 2
Preparing the glass pieces
Clean all glass well with warm soapy water and make sure they are thoroughly dry
and lint free before gluing. I used a microfiber cloth to "polish" the glass before gluing.
You can use denture cleaning tabs for hard to clean vases (1-4 tabs per vase usually works).

step 3
Gluing
Use a clear silicone glue or Lexel for best results.
Make sure the adhesive you use is weather resistant.
Glue up pieces in sections, letting each section cure before putting them all together as one piece.
Try gluing the pieces during low humidity to reduce condensation.

step 4
Displaying your totems
You can make free standing totems or use an upside down vase glued to the bottom
to mount them on poles. Copper is a popular choices, but with prices being so high
these days, I use PVC conduit pipe (the gray stuff in the home improvement stores).
You can paint it using a spray paint specifically for plastics to give it the look of copper or
any other color you may like. R…

step 5
Displaying them in your garden
They really sparkle in the sun and look great in the garden. The options are endless.

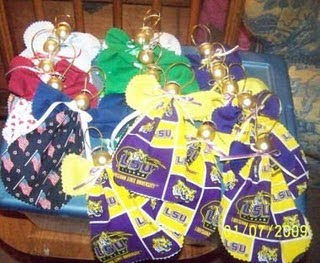
The Pocket Angels


Gwen's Pocket Angels
Instructions for pocket angel
Materials
Scrap material small ornament balls thread scissors hot glue gun wedding rings or pipe cleaner for halo ribbon cord or fishing line
 1. Cut your material out

2. Gather top of dress and middle of wings

3.glue dress to ornament

4. glue wing piece on back

5. This is what you have now

6. Glue halo on

7. Now glue your little bow on

8. Now glue you little cord to the back.

Fishing line works good too

Saturday, February 27, 2010

Paper Dolls

Who does not lkike paper dolls !
I found this fun Tutorial on Magnetic Dolls. HERE
Really cute http://www.onepearlbutton.com/
Also a paper doll to Print and use.